


Project Log
In our family we exchange homemade Xmas cards instead of gifts (much easier to get the right size &c).
A few years ago I saw this video and shortly after I came across low voltage strings of LED Xmas lights in a January clearance and the cards my wife & I make haven't been the same since
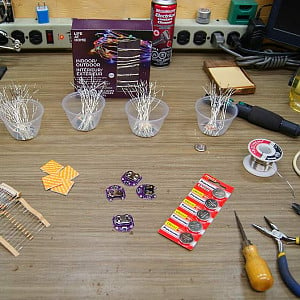
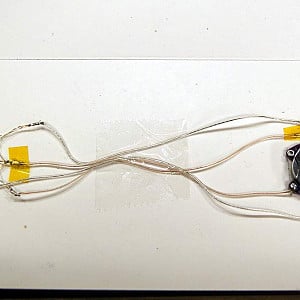
My part of the project starts with spray painting some of the folders we make the cards from and then waiting for instructions on where to put the lights. While I'm waiting I cut up a string or 2 of lights. The ones I have are SMD LEDs soldered directly to a pair of wires with a little blob of resin over each one so I cut both wires off about 1cm past each LED, leaving long wires to connect them and short ones to help attach them to the cards.
Next I tin the ends of the long wires (easier than trying to strip the lacquer manually), test each one for polarity, mark the negative (I always have a black marker handy) and sort them by colour.
Clive used LEDs that need more current so he had to use larger batteries but I use CR2032s and stick their holders on with 25mm squares of double stick foam tape from the $1 store

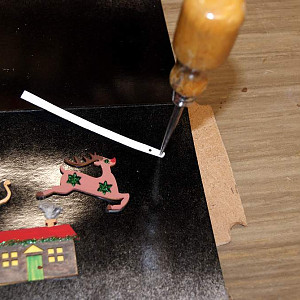
Here's one LED with the polarity marked, one with the leads bent and the hole spacing jig I made from a piece of thin plastic.

And here's the jig in use with a small awl I keep on the electronics bench.
Note that I have a scrap piece of hardboard (Masonite) under the card so the awl doesn't put holes in the bench.

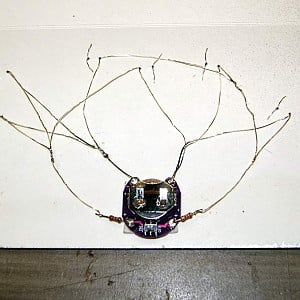
Once the holes for all the LEDs are punched I slide the wires through and fold them over

I'm still finding my way around this forum and the pics look like the ends are cut off in the preview so I'll stop at this point to see how it looks posted.
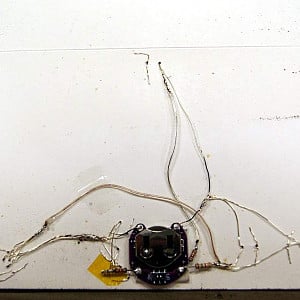
When all the LEDs are attached to the card I attach the battery holder and connect up the negative wires. The battery holders I bought this year have 2 pads each for positive and negative, which simplifies things a bit. The heat of soldering easily vaporizes the lacquer so all you have to do is twist the wires and solder.

Last year I used holders without switches so I added a resistor to limit the current to a value that would let the batteries last a month. Using just 1 resistor the red and yellow LEDs were brighter than the blue and green ones. This also dimmed the lights (I didn't want them bright enough to light the room at night).
Since this year's holders have switches I wasn't so concerned about battery life so I used separate resistors for red & yellow and blue & green in most of the cards. For most of them a 2.2kΩ for 3 red & yellow and a 1.2kΩ for 3 blue & green looked about right, which was still less than 1 mA total.
The positives connected. Note that I try to keep the solder joints separated as much as possible

And the with the lights on.

Another one with basically the same wiring

After this they go back to my wife to add an insert with a verse and into an envelope (another of my contributions is making the envelopes from heavyweight wrapping paper).
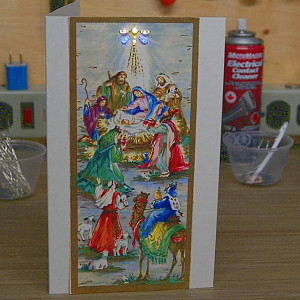
I didn't take pics of all 9 of the cards because the wiring was more or less the same for most of them but the last 2 were a bit more involved. My wife wanted all of the lights in the one for her Mum to be in the star above the nativity scene and something brighter in the middle of the star, which meant 3 yellow LEDs, 2 blue ones and a 3mm warm white (close enough to the colour of the yellow ones) all in a space about 2 cm x 1.5 cm and with the 3mm's bare leads that meant Kapton tape would be needed. It is also the only one with the long axis vertical this year so the wires from the LEDs wouldn't reach the battery holder and since the 3mm one needed higher current a 3rd resistor would be required

But it was worth it (the pics don't really do them justice)

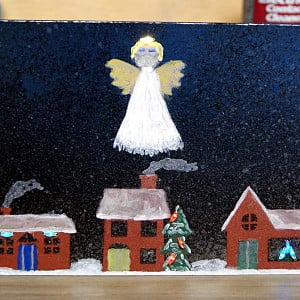
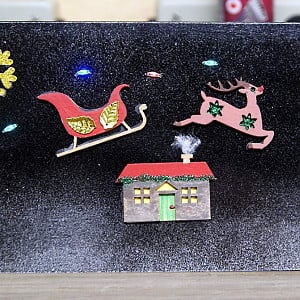
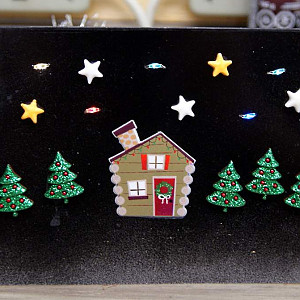
The last one was for my wife (as I type this she won't see it until tomorrow). Instead of decorating the laser cut wood ornaments and gluing them on like she did (& I did last year) I sprayed the card with oxide primer near the bottom and silver near the top and then laid 3 laser cut houses and an angel on to act as masks while I sprayed blue and black for the night sky. Because the card is flat I wanted to light it up more so it has a total of 9 LEDs and I wanted the one on the angel to be brighter so it has a separate resistor

I also spent quite a bit of time adding snow on the ground and detailing it with acrylic paints. The angel's mask doesn't stand out very well so I think I'll outline it.with a dark pencil but otherwise I think it turned out pretty good.

That's all for this year's cards. Now on to more electronical projects
A few years ago I saw this video and shortly after I came across low voltage strings of LED Xmas lights in a January clearance and the cards my wife & I make haven't been the same since
My part of the project starts with spray painting some of the folders we make the cards from and then waiting for instructions on where to put the lights. While I'm waiting I cut up a string or 2 of lights. The ones I have are SMD LEDs soldered directly to a pair of wires with a little blob of resin over each one so I cut both wires off about 1cm past each LED, leaving long wires to connect them and short ones to help attach them to the cards.
Next I tin the ends of the long wires (easier than trying to strip the lacquer manually), test each one for polarity, mark the negative (I always have a black marker handy) and sort them by colour.
Clive used LEDs that need more current so he had to use larger batteries but I use CR2032s and stick their holders on with 25mm squares of double stick foam tape from the $1 store
Here's one LED with the polarity marked, one with the leads bent and the hole spacing jig I made from a piece of thin plastic.
And here's the jig in use with a small awl I keep on the electronics bench.
Note that I have a scrap piece of hardboard (Masonite) under the card so the awl doesn't put holes in the bench.
Once the holes for all the LEDs are punched I slide the wires through and fold them over
I'm still finding my way around this forum and the pics look like the ends are cut off in the preview so I'll stop at this point to see how it looks posted.
When all the LEDs are attached to the card I attach the battery holder and connect up the negative wires. The battery holders I bought this year have 2 pads each for positive and negative, which simplifies things a bit. The heat of soldering easily vaporizes the lacquer so all you have to do is twist the wires and solder.
Last year I used holders without switches so I added a resistor to limit the current to a value that would let the batteries last a month. Using just 1 resistor the red and yellow LEDs were brighter than the blue and green ones. This also dimmed the lights (I didn't want them bright enough to light the room at night).
Since this year's holders have switches I wasn't so concerned about battery life so I used separate resistors for red & yellow and blue & green in most of the cards. For most of them a 2.2kΩ for 3 red & yellow and a 1.2kΩ for 3 blue & green looked about right, which was still less than 1 mA total.
The positives connected. Note that I try to keep the solder joints separated as much as possible
And the with the lights on.
Another one with basically the same wiring
After this they go back to my wife to add an insert with a verse and into an envelope (another of my contributions is making the envelopes from heavyweight wrapping paper).
I didn't take pics of all 9 of the cards because the wiring was more or less the same for most of them but the last 2 were a bit more involved. My wife wanted all of the lights in the one for her Mum to be in the star above the nativity scene and something brighter in the middle of the star, which meant 3 yellow LEDs, 2 blue ones and a 3mm warm white (close enough to the colour of the yellow ones) all in a space about 2 cm x 1.5 cm and with the 3mm's bare leads that meant Kapton tape would be needed. It is also the only one with the long axis vertical this year so the wires from the LEDs wouldn't reach the battery holder and since the 3mm one needed higher current a 3rd resistor would be required
But it was worth it (the pics don't really do them justice)
The last one was for my wife (as I type this she won't see it until tomorrow). Instead of decorating the laser cut wood ornaments and gluing them on like she did (& I did last year) I sprayed the card with oxide primer near the bottom and silver near the top and then laid 3 laser cut houses and an angel on to act as masks while I sprayed blue and black for the night sky. Because the card is flat I wanted to light it up more so it has a total of 9 LEDs and I wanted the one on the angel to be brighter so it has a separate resistor
I also spent quite a bit of time adding snow on the ground and detailing it with acrylic paints. The angel's mask doesn't stand out very well so I think I'll outline it.with a dark pencil but otherwise I think it turned out pretty good.
That's all for this year's cards. Now on to more electronical projects