partyanimallighting
- Oct 22, 2012
- 330
- Joined
- Oct 22, 2012
- Messages
- 330
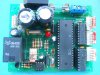
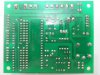
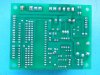
Hello everyone,
I have two of these unit that were giving problems and I actually managed to troubleshoot and repair one but I am having problems with the other pcb. The units are fairly simple. They run on 12V ~ 18V DC and are powered by a 12V toroidal transformer and have three motors that control a shutter, an iris and a color wheel (the terminals for these motors on on the right of the image). The converter at the top converts the 12V power from the transformer to DC. The pcb I repaired before had a faulty relay and diac (located bottom left) but the other pcb has a different problem. When I power it up, I get 18V at the relay terminals and an audible click from the relay but I am not getting any output. Any ideas? I'll be grateful for any help I can get.
partyanimallighting