Maker Pro
Maker Pro

Split Rail Power Supply

Supercap2F

Mar 22, 2014
550
Joined
Mar 22, 2014
Messages
550
Yes what you described would work very good. I attached a photo of my current setup it does not have a lot of components but it would be fine to increase them. Do you have a circuit that would work like you said? I did not see any thing on the link you attached that was quite like what you were talking about.

Thanks
Dan
 

Attachments

  • breadboard.JPG
    breadboard.JPG
    40.9 KB · Views: 172

KrisBlueNZ

Sadly passed away in 2015
Nov 28, 2011
8,393
Joined
Nov 28, 2011
Messages
8,393
Here's a schematic of the kind of thing I was thinking of.

attachment.php


The input supply is shown on the left. I've specified an operating voltage range of 9~32V DC. D1 sets a roughly constant voltage across the Q5 circuit to minimise current variations with supply voltage. Q1~4 form a standard complementary output stage as found in many audio amplifiers. The quiescent current in the output stage is set by the voltage across Q5, and Q5 must be thermally connected to the heatsink with the output transistors on it, to compensate for temperature changes in the output transistors and prevent thermal runaway.

Q4 should be a 2N2955. I only used the D45H11 because the simulator doesn't have the 2N2955. The 2N3055 and 2N2955 are TO-3 devices; you can use MJE3055/2955 or TIP3055/2955 instead if you want a package that's easier to mount.

Q5's bias is controlled by R6, which actually needs to be a 2k trimpot, not a fixed resistor as shown. Connect to the wiper and the fully clockwise end, and turn it fully anticlockwise before powering up the circuit. Then measure the voltage drop across R7 and R8 (i.e. voltage between Q3 emitter and Q4 emitter); the output stage current is V / R where V is the voltage you measure, and R is 0.66 ohms (the sum of R7 and R8). Adjust R6 to get the desired current in the output stage.

A typical current would be 0.1 amps. Higher current gives a "stiffer" half supply output rail, but wastes more power and causes more heat dissipation. Total dissipation in the output transistors is equal to the supply voltage multiplied by the output stage current. This could range from several watts to dozens of watts, depending on the current you choose, so the heatsink may need to be quite big. After adjusting R6, wait ten minutes for the heatsink temperature to stabilise.

This design doesn't use any feedback, and relies on having a fairly high output stage current to give a low-impedance half supply output. I'm not sure that's the best way to do it. Opinions anyone?
 

Attachments

  • t267950.gif
    t267950.gif
    11.3 KB · Views: 673

Arouse1973

Adam
Dec 18, 2013
5,178
Joined
Dec 18, 2013
Messages
5,178
Looks good Kris. A modified output of an audio amplifier with bias servo? Good idea.
Adam
 

duke37

Jan 9, 2011
5,364
Joined
Jan 9, 2011
Messages
5,364
Very posh Kris.
It all depends on the specifications to be met but the bases of Q1 and Q2 could be connected together and the output emitters connected together. Some capacitance from 0V to V+ and V- would help. This is a simpler version which may be good enough.

The circuit will pass current when the load on V+ differs from V-. Heat sinks are likely to be necessary.
 

(*steve*)

¡sǝpodᴉʇuɐ ǝɥʇ ɹɐǝɥd
Moderator
Jan 21, 2010
25,510
Joined
Jan 21, 2010
Messages
25,510
Why not use an op-amp in the fairly classical circuit to split the supply rail.

You would probably need the output to drive a pair of BJTs, and some emitter load and capacitance on the output would be desirable.

The minimum input voltage would depend on the op-amp and it's ability to swing it's output hard enough to turn on the transistors.
 

KrisBlueNZ

Sadly passed away in 2015
Nov 28, 2011
8,393
Joined
Nov 28, 2011
Messages
8,393
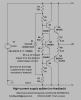
Yes Steve, you're right. The output impedance is too high unless an op-amp is used.

attachment.php


I tried the circuit without L1, L2, C2 and C3, and got some pretty good numbers. The output impedance at the junction of R7 and R8 was about 0.001 ohms at 1 kHz, increasing to about 0.01 ohms at 10 kHz.

Unfortunately, with that circuit, you can't just add smoothing capacitance across the output rails - this causes instability, so I've taken a different approach - individually decouple both positive and negative rails to the derived 0V rail with LC filtering.

I have specified the series resistance of the inductors and the ESR of the capacitors, but the addition of those components has increased the output impedance of the rails, although it should prevent the problem I was trying to avoid: load changes on one rail causing voltage changes on the other rail.

With the circuit shown, in simulation, output impedances on the V+ rail (relative to 0V) are 0.03R at 10 kHz, 0.06R at 1 kHz and 0.07R at 100 Hz. This was with an ESR of 0.1 ohms for the input source.

I tried adding capacitance from point A to point B, and from point C to point D, but it had no noticeable effect.

The circuit will work from 12V to 36V. An output current of about 100 mA seems to work pretty well for preventing crossover problems when the direction of the output current changes. This is adjusted with R6, which actually needs to be a 2k trimpot, not a fixed resistor as shown. Connect to the wiper and the fully clockwise end, and turn it fully anticlockwise before powering up the circuit. Then measure the voltage between points E and F and adjust R6 to get 66 mV. After adjusting R6, wait ten minutes for the heatsink temperature to stabilise, then readjust and repeat.

The op-amp can be any general purpose device, even a 741 should be OK. Output loading on the op-amp is around 10 mA.

Any other specific suggestions anyone?
 

Attachments

  • epoint t267950.002.gif
    epoint t267950.002.gif
    15.1 KB · Views: 496

Supercap2F

Mar 22, 2014
550
Joined
Mar 22, 2014
Messages
550
Hey Kris,

Sorry about the delay in responding (I went to a robotics competition last weekend and I have been working on some other projects).

My questions are:
1. What do you mean by "Q5 must be thermally coupled to the output transistors heat sink"?
2. R7 and R8 are 0.33 ohms were am I going to find a resistor with that low of resistace?
3. Next to the -V on the power supply there is a arrow pointing down what is that?
4. L1 and L2 are coils so what are there ratings? Are they 1uH 0.05 ohms and rated at 3 amps?
5." An output current of about 100 mA seems to work pretty well" Are you saying that it only has a output current of 100mA?

Thanks ;)

Dan
 

davenn

Moderator
Sep 5, 2009
14,268
Joined
Sep 5, 2009
Messages
14,268
Hey Kris,

Sorry about the delay in responding (I went to a robotics competition last weekend and I have been working on some other projects).

My questions are:
1. What do you mean by "Q5 must be thermally coupled to the output transistors heat sink"?

literally in physical contact with this is usually done with a small clamp or often a dab of araldite

2. R7 and R8 are 0.33 ohms were am I going to find a resistor with that low of resistance?

any decent electronics component supplier will have them ... they are common values

3. Next to the -V on the power supply there is a arrow pointing down what is that?

its a ground ( chassis connection)

4. L1 and L2 are coils so what are there ratings? Are they 1uH 0.05 ohms and rated at 3 amps?

yes

5." An output current of about 100 mA seems to work pretty well" Are you saying that it only has a output current of 100mA?

Thanks ;)

Dan

pretty much, yes ... as was commented in a couple of previous posts, we are not sure if Kris realised that as he didn't specify that it could do 1A or more

Tho those output inductors and transistors have the ratings for several amps

cheers
Dave
 
Last edited:

KrisBlueNZ

Sadly passed away in 2015
Nov 28, 2011
8,393
Joined
Nov 28, 2011
Messages
8,393
Dave's answers are right except:

3. Next to the -V on the power supply there is a arrow pointing down what is that?
It's needed by the simulation software. It tells the software that this is the "0V" rail, i.e. the rail that all voltages are (by default) measured relative to. It doesn't have to correspond to anything in reality. If I didn't have one there, when I tried to simulate the circuit I would get lots of error messages.
5." An output current of about 100 mA seems to work pretty well" Are you saying that it only has a output current of 100mA?
No. I simulated it with currents up to ±3A I think. Definitely more than ±1A. The 100 mA is the quiescent current that flows through the output transistors at all times. It is wasted energy, but it's needed. Without it, whenever the direction of the load current changes, there will be a delay during which neither of the transistors is conducting. When the circuit is being used as an audio amplifier (that's what it's based on), this is called crossover distortion. In this case it affects the "stiffness" of the "0V" output.

Edit: To avoid confusion. The "0V" reference used by LTSpice, indicated by the downwards-pointing triangle, is different from the "0V" output. The "0V" output is the 0V reference used by any circuits that are powered by that circuit. The simulator's 0V point is only used by the simulator. The two are different and have different purposes.
 
Last edited:

davenn

Moderator
Sep 5, 2009
14,268
Joined
Sep 5, 2009
Messages
14,268
No. I simulated it with currents up to ±3A I think. Definitely more than ±1A. The 100 mA is the quiescent current that flows through the output transistors at all times. It is wasted energy, but it's needed. Without it, whenever the direction of the load current changes, there will be a delay during which neither of the transistors is conducting. When the circuit is being used as an audio amplifier (that's what it's based on), this is called crossover distortion. In this case it affects the "stiffness" of the "0V" output.

I wondered if you may have been referring to a quiescent current
wasn't sure as were the other questioning the 100mA LOL


It's needed by the simulation software. It tells the software that this is the "0V" rail, i.e. the rail that all voltages are (by default) measured relative to. It doesn't have to correspond to anything in reality. If I didn't have one there, when I tried to simulate the circuit I would get lots of error messages.

that sounds vaguely familiar from some one else's comments in the past
I don't use circuit sims ... so not so familiar with those little traps ;)

Dave
 
Last edited:

KrisBlueNZ

Sadly passed away in 2015
Nov 28, 2011
8,393
Joined
Nov 28, 2011
Messages
8,393
Yeah, it's easy to forget to put the little triangle in there, and every time I do, I get errors. I'm a bit surprised that it needs it really. I guess you could connect the triangle to any point in the circuit and the simulation should still work. Maybe connecting it to a reference point makes some of the mathematics easier and speeds up the simulation. I don't really know. The internal operation of circuit simulators is "white man's magic" to me :)
 

Supercap2F

Mar 22, 2014
550
Joined
Mar 22, 2014
Messages
550
I still do not understand what you mean by "Q5 must be thermally coupled to the output transistors heat sink". Can you give me a more in-depth explanation? You say it will work with 12-34V does it put out 12V if you put 12V in?

Thanks :)

Dan
 

KrisBlueNZ

Sadly passed away in 2015
Nov 28, 2011
8,393
Joined
Nov 28, 2011
Messages
8,393
Q5 must be at the same temperature as the heatsink with the output transistors on it. Since Q5 is in a TO-92 package, which is a cylinder with a flat on it, it's common to press the flat face against the heatsink, using some kind of spring clip. Alternatively you can drill a hole in the heatsink and stick the transistor into it. Or you can get a TO-92 heatsink and attach that to the main heatsink. As long as the temperature of Q5 tracks the heatsink temperature. Thermal paste (white goop) can be used to improve heat transfer to the transistor.

The circuit splits the supplied voltage in half. If you feed 12V into it, the outputs will be +6V, 0V, -6V. If you feed 36V into it, the outputs will be +18V, 0V, -18V. Of course the input supply must be isolated, because the negative side of the incoming power, which would normally be called the 0V rail of the power source, becomes the negative output. So the power source must not have any external circuit that would (for example) short its negative output terminal to the 0V rail of the circuitry that is being supplied by the splitter.
 

Supercap2F

Mar 22, 2014
550
Joined
Mar 22, 2014
Messages
550
Are you saying that I should connect Q5,Q4 and Q3 all to the same heat sink? Do Q1 and Q2 need to have heat sinks on them to?

Thanks

Dan
 

Supercap2F

Mar 22, 2014
550
Joined
Mar 22, 2014
Messages
550
The lowest output voltage for your circuit is 6VDC is there a way to take it down to 5VDC? Is that what the 7905 is for? What wattage are the resistors? The the coil (L1 and L2) are very hard to find with those exact ratings. Is digikey part number 811-2018-ND good enough?

Thanks for all the help :)

Dan
 

KrisBlueNZ

Sadly passed away in 2015
Nov 28, 2011
8,393
Joined
Nov 28, 2011
Messages
8,393
Yes, you can use a regulator to drop the output voltages, but the 78xx and 79xx devices aren't suitable - their dropout voltages are too high. The dropout voltage is the minimum input-to-output voltage difference, and the 78xx/79xx have dropout voltages of around 2~2.5V so you would need to feed them with at least 7.5V to get stable 5V out of them.

Also, the 7905 you mentioned is the negative regulator. You could use it on the negative rail (if there's enough voltage, as I mentioned). The positive version is the 7805.

Yes, that inductor looks good.

Edit: If you can't increase the positive and negative voltages from 6V to at least 7.5V, you can use low dropout ("LDO") regulators. These ones look suitable:
http://www.digikey.com/product-detail/en/LP3852ET-5.0/NOPB/LP3852ET-5.0/NOPB-ND/568397 (positive) or
http://www.digikey.com/product-detail/en/L4940V5/497-1404-5-ND/585925 (positive) or
http://www.digikey.com/product-detail/en/BA50JC5T/BA50JC5T-ND/2337056 (positive);
http://www.digikey.com/product-detail/en/LM2990T-5.0/NOPB/LM2990T-5.0/NOPB-ND/182372 (negative).
 
Last edited:

Supercap2F

Mar 22, 2014
550
Joined
Mar 22, 2014
Messages
550
Ok will this circuit work to take it down to 5VDC?

Thanks

Dan
 

Attachments

  • Image (2).jpg
    Image (2).jpg
    65.7 KB · Views: 184
Top