Maker Pro
Maker Pro

review of Sport Devices CDI digital ignition 16F84A code for a 2 cycle gas engine

bob weir

Sep 10, 2014
235
Joined
Sep 10, 2014
Messages
235
hey , loyal readers & followers of my CDI ignition work ... this is a new project. with a uC not
seen before. prepare for things being on the increase in your life. and riding the leading edge of a wave of knowledge and discovery

the other CDI project with its baseline uC is still underway. the 2 projects are being posted
seperately. and are expected to have similarity and overlap. we'll find out just how much

the plan here is to take a close look at their circuit and assembly code for the CDI ignition at their site.
with the goal of learning the how and what all they did.

they used a mid-range 16F84A uC

the internet is one vast landscape of ideas being presented and shared.

so lets see if we can discover any of the ideas & structure behind their '84A code.

and then have a look at adding any of them to the code work in my other CDI
igniton project posted here in the electronic projects forum

..... ( in addition to the uC assembly code is a link to a CDI circuit different from
the one i am using. it is based on the UC3845 IC. find it at the bottom of
their page in the 'other links' section )

and begin with the recognition that what they have posted may not work.
any part of it and the whole of it all needs to be verified.

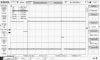
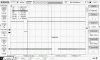
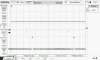
one obvious difference with their work an mine is they are working with
a 2-cycle engine, while mine is a 4. and by their timing diagram it
spins up to 5K RPM before needing any advance.

here is the link to their work :
http://www.sportdevices.co.uk/ignition/ignition.htm

and a note to clarify programming their *.asm file onto a 84A uC ...
the PicKit-2 and PicKit-3 do both support this uC. but not the 'C84 or '84

i'm counting on help from the readers among you with MPLAB assembly
coding experience in lookup tables,
interrupts and other new code features like cblock expressions.

plus input from dirt- bikers who can confirm a 2-cycle engine not needing any advance
until it gets to 5K rpm

right out of the starting blocks we have to figure out what speed of a clock
they used. its not shown in the circuit or mentioned in the code.
and whatever type of clock it is the '84A uses an external one.

this clock rate is vital to know. coding projects for an ignition system are timing critical.
we use the known clock rate to decide the RPM's . and after that to wait some
amount of time after the flywheel timing pulse to fire the CDI circuit. and thus meet
the timing advance requirement.
 
Last edited:

Alec_t

Jul 7, 2015
3,590
Joined
Jul 7, 2015
Messages
3,590
the leading edge of a wave of knowledge and discovery
The '84A may have been leading edge way back in 2001, but not now :D. It's now expensive compared to much better modern PICs.
 

Bluejets

Oct 5, 2014
6,927
Joined
Oct 5, 2014
Messages
6,927
Last edited:

bob weir

Sep 10, 2014
235
Joined
Sep 10, 2014
Messages
235
https://www.ecsxtal.com/store/pdf/ecs-100x.pdf

this link will take you to the clock oscillator being used with my 16F84A uC for this project.

what's special about it is having a TTL output.
the 84A takes this on a single input pin 16.
and outputs 1/4 that rate on pin 15.
thus you have a 2'd clock signal available.

for possible use in the DC_DC CDI circuit.
or somewhere else not thought of yet.

the attached *.jpg is a screen shot off the 1054 Rigol scope.
the top trace is on input CH 1 and shows the 4.0Mhz ECS-100X oscillator signal to pin 16.
the bottom trace is what comes out of 84A's pin 15. 1/4 of what went in pin 16
or as Microchip puts it : Fosc/4

note too at the screen bottom line ... Freq=4.00MHz ... Freq=1.00MHz

in order to get these 'Freq' values there has to be at least 2 signal periods for each CH input.
that is a Rigol scope requirement.
here we see 6 periods of the 1.00 MHZ clock signal and 24 of the other at 4.0M
so the requirement of at least 2 signal periods is met.

4.0  1.0 CLK pin 16 then pin 15.jpg

.... the next post will be a sketch of my 84A circuit & connections, the test data, and some screen shots.
............meantime i want to crunch the numbers and see how well they match up
with the Spt Dev's posted timing advance curve.

one encouraging sign is the 'fire' pulse , or what they call 'scr_pulse' , as it is coming out
of pin A2 very close to 200uS in width for all B0 input pulses in the 50 - 150 Hz range.

and this matches what is shown in the *.asm code on p.1
in the " ;setup values" section. and affirms their clock is indeed running at 4.0MHz
 
Last edited:

bob weir

Sep 10, 2014
235
Joined
Sep 10, 2014
Messages
235
84_SD_ckt_diag_1.jpg PICKUP 72 to Pulse 1-0-1 at B0.jpg update ... Jan 25


for this post we will review the S/D 'F84 ckt diag. in particular the PICKUP signal from the flywheel sensor.
by the diagram you see that this negative sine wave lobe is applied to the emitter of the
BC547 npn transistor. the question is what is the signal off the collector as seen by pin B0 ?

well , to find out , the circuit was built on a bread board and powered. then a function generator sine wave is connected to the emitter thru a series R. scope probes on the emitter and collector showed what then happens. and the screen shot is posted here, above ...

the top trace , CH 1 , is the input sine wave , ... about +/-3Vpp
and the lower trace is CH 2 , the resulting rough pulse that pin B0 sees. given its
sloping sides that B0 pin had better be a Schmitt trigger . by p. 4 of the F84A data this
pin is ST only when configured as an INT. and the only INT coded for is TMR0 overflow.
so this is a circuit design error. it should have an added chip to sharpen up the sloping sides.

or route this 72 pulse in via a different pin. on data Table 1-1 are seen 5 other
pins with ST input function

for our purposes it is not anything to bother with. as our test signal will be from a 2MHz DDS. and it will be a pulse , not a sine wave. with very sharp , fast rise-time sides.

from the 84 ckt diagram you can see that the once the emitter voltage drops from about -1V to -2V the Q turns on. with the result that pin B0 sees a 1-0-1 pulse to indicate the -72 deg timing signal is present.

now we know what to apply to the F84A on a test bd. bd. setup to simulate the engine signal.
note too that this 72 deg pulse is the only engine signal the uC gets. once per revolution.
so the time between 72 pulses represents 360 deg. and thus is the period of one rotation.

one related matter with this 1-0-1 pulse is which edge 1-0 or 0-1 does the 84 code
zero in on . for the period timing it doesnt matter much which edge you choose. but for the
spark fire pulse out to the CDI circuit it does. and if you guess wrong you'll be off
by the width of the 72 deg pulse. and this width varies with RPM.

on looking at the code with labels = ... wait_pulse: & wait_high: & wait_low:
i'm getting that the 72 trigger event is a 0-1 rising edge. and thus interpret the time-to-fire
as being measured from this edge. now i could have it wrong. time or one of you will tell me.

if you've printed out S/D's *.asm file this "wait..." code is on p. 4 and 5 of what took my
HP deskjet 3636 10 pages to print out.
 
Last edited:

bob weir

Sep 10, 2014
235
Joined
Sep 10, 2014
Messages
235
jan 27 .. update with the SD 84.asm & ckt work.
by their circuit diagram and some code review it is possible to determine the RB2 pin with the 'curve selector' label is not as shown. nowhere did i find that pin being read. thus i conclude its a leftover from some earlier version of their code development.

given only the 72 deg signal goes to the 84A then it is expected that a 1-0-1 pulse to that B0 pin from a signal
generator would mimic the flywheel signal. and the 84A could not tell the difference. thus it follows that the
code measures the period of these input B0 pulses and then figures how much delay from that pulse to wait
before sending a A2 pulse to fire the spark plug.

this was the plan for a bit of test work earlier this week. pulses ( actually they were a square wave dialed down to a DC = 2%) in the range 50 to 150 Hz ( or 3000 to 9000 RPM ) were applied to the B0 pin. and the scope
monitored both B0 and A2. there was an A2 pulse emitted for every one of the 11 input pulses. and the time
from the TE of 72 to LE of A2 was measured and recorded. then some math done to figure the actual timing
degree when the A2 pulse occurred. see the data and plot of it on the image to the R.84_asm exp test jan 23.jpg

a plot of the data shows it to not match the timing curve at the SD site.
despite that we do see that for the sub-5k rpms the timing deg is a constant.

i'm just happy we got something out of A2. and , who knows, maybe this is just
how their 84.asm code works. i.e. not very well.

the task now is to understand how we got what we got. and that's going to take some work.
in particular i want to know if the time delay to fire is the result of one timing loop or the sum
of 2 or more.

after the dust settled an error on my part was discovered. actually possibly 2.
the first was on taking their 84.asm file and using MPLAB to turn it into a project then
burning the hex file into my 84A uC. the code may have been altered during an
effort to re-arrange some of the comments. the 2'd was noticing that the 2% DC
settting for the DDS sqr wave meant its pulse out width changed with freq'.

the result of this was to re-build a project with a fresh *.asm download and not
do a thing to it. i.e. build it as-is. and it did. then on the next round of testing it
with the DDS-2 sqr wave the delay to fire time was measured from the LE
of the B0 pulse to the LE of the A2 fire pulse. the data was collected and plotted.
the result was the same. constant deg of advance. and not a sloped curve for
rpms above 5k. oh, the degrees themselves were different. but still off the mark

also during this latest test a scope probe was connected to A4 , the led pin.
one can find several lines of code that turn the led on and off. and this could
be a clue as to what part of the assembly code was executing.

no led signals were detected. a surprise at first. then i thought how narrow
they would be in terms of the size and spacing of the other 2 pulses.

... also i was rusty on how one goes about capturing infrequent pulses with the scope. doing this takes some time to learn and get right. and an apparent s/w bugaboo was found.
it has to do with locating the trigger point for a horiz sweep in the range of the
scopes data memory range. i was having to repeat the same steps 2 or 3 times before
the 'T' trigger icon would jump to its proper place . once this T icon was in place i had success
triggering on single pulses as narrow as 1uS

plus for awhile i was able to trigger on a single pulse in both 'auto' and 'normal' mode.
until now i'd thought only 'single' could do that.

one other lesson is to code these pulses to be wider. 100's of uS if possible
so that they show up when the H=.005 for the B0 and A2 signals

for subsequent pulse input tests the former 16F506 will be used again. as its pulses
can be coded to have a constant width for all output freq's. remember this uC as
having ADC ability. and a pot was used to supply a number that was then used to
control the no. of 32u timer loops for the spacing of the pulses.

one thing i want to know is if the 84A code will kick out a A2 'fire' pulse with just
2 B0 input pulses. or does it need 3 ?

if it does then one idea is to add some SEROUT code to see what the TMR0
value is .. this could result in learning if the periods measured for the 50-150 Hz
input pulses are being read with psa = 128 or 256. and then to use SEROUT for other
variables and see how they all inter-relate. one last goal is to find out the nature
of that look-up-table having 57 entries. and what its table of retlw numbers mean

there are a few more coding things i have targeted to learn more about.
and i'll mention them later on when the time is right
 
Last edited:

bob weir

Sep 10, 2014
235
Joined
Sep 10, 2014
Messages
235
jan 28
here are 3 screen shots of the scope for some of the data table posted yest, jan 27.
they are for 50 , 100 and 150 Hz.
they show the cursor BX-AX time measurements for those 3 B0 input pulses in that table.
as well as showing the width of the CH 1 B0 pulses changing in width with the freq.

this width change was caused by the B0 pulses coming from a DDS square wave and not
a true pulse generator. the square wave was made to look like a pulse by changing its
DC from 50% to 2%.

and the CH2 'fire' pulse had a constant width = 200uS as coded for the SCR_PULSE ..
it is this width that adds credence to the 84A clock = 4.0MHz

note - how at the screen bottom the Freq = ***** . due to only one pulse per line
i.e. the scope s/w needs 2 pulses on the screen to calculate a Freq
 

Attachments

  • 50Hz input rate.jpg
    50Hz input rate.jpg
    74.1 KB · Views: 137
  • 100Hz input pulse.jpg
    100Hz input pulse.jpg
    71 KB · Views: 80
  • 150Hz.jpg
    150Hz.jpg
    74.1 KB · Views: 127
Last edited:

bob weir

Sep 10, 2014
235
Joined
Sep 10, 2014
Messages
235
jan 28
this scope image has a value for Freq . = 150Hz. only , now with the H=1.00ms the scale is too coarse ( vs the H=200us above )
for careful alignment of the cursor over the pulse edges for accurate BX-AX measurement .

the image is an example of where wider pulses could be coded so they can be measured with better accuracy on the screen where 2 pulses per line appear. i.e. code them wide for testing
purposes , then later reduce them back to what their design calls for
 

Attachments

  • with 2 pulses see freq no..jpg
    with 2 pulses see freq no..jpg
    58.2 KB · Views: 121
Last edited:

bob weir

Sep 10, 2014
235
Joined
Sep 10, 2014
Messages
235
feb 2 update

problems. a big one .....

my ' Easy PIC'n ' book (1997) that serves as a guide for working with the 84A indicates that
the configuration bits are set (for its code examples) at the time the uC is programmed.

until now configuration has been handled with the baseline uC's with a line in the code.
something like this ...
_CONFIG ........ _MCLRE_ON & _CP_OFF & _WDT_OFF & .....etc.

with my MPLAB v. 8.70 ... when such a line is added to the 84A code the BUILD step fails.
back in '97 they were using either a DOS or W95 - based assembler.

as of now it appears that unless your programmer allows you to set the config bits
manually at the time of programming you wont be able to program the 84A with the
assurance the bits are the way you want them to be.

as it is the default config is 3FFF. which sets the clock for an RC osc.

for now this has me stumped.
so will mull it over and in the meantime return
to the other CDI ignition project on this forum.

if you have any ideas that address this 84A configuration matter please
trot them out
 
Last edited:

bob weir

Sep 10, 2014
235
Joined
Sep 10, 2014
Messages
235
feb 6 update
the 84A bit configuration matter is a problem no longer.
the path to the answer had been in front of me the whole time.
right there along the MPLAB 8.70 tool bar is a 'Configure' choice.
like many aspects of this s/w program i havent had any reason to use it yet.
thus it remained something not noticed.

84A 3FF1 config  feb 6.jpg

so what one has to do is while your 84A project is open is click it then
select the settings you want for the 4 bits. then somehow MPLAB makes
that info be available for a PicKit-2 programmer . and the bits are set
how you want them to be. the setting you saw on the MPLAB page is
reflected on the PK-2 programming screen. this gives you confirmation.


in this case they went from the 3FFF default with a RC OSC
to 3FF1 for a XT (crystal module) oscillator. now ther 84A will
run with more timing accuracy
 
Last edited:

bob weir

Sep 10, 2014
235
Joined
Sep 10, 2014
Messages
235
feb 6
lest you be left with the impression that the 84A config' bits have to be set with the
toolbar method ... i ask that you see the *.asm for an 84A at Sport Devices site.
..... there you will find the line :
__CONFIG _WDT_OFF & _XT_OSC

and this S/D asm file does build with this line in it. using MPLAB v. 8.70

this is the very thing i was unable to do with a freshly written 84A asm file.
a new project with this asm code would not build with a _CONFIG line in it.

this remains a puzzle.

at least its not a block anymore. as we now have another way to set the bits
besides a line of code
 
Last edited:

bob weir

Sep 10, 2014
235
Joined
Sep 10, 2014
Messages
235
SD 84asm p.1.jpg SD 84asm  p.2.jpg SD 84asm  p.3.jpg SD  84asm  p.4.jpg
feb 8
posted are 4 *.jpg scans of the SD 84.asm . the pages all have line numbers.
they can easily be printed out
thus you will be able to follow along when code is referenced by them.

for instance while this asm file was BUILT earlier this eve it did build but came
with 3 warnings. all 3 were close together ... lines 123 , 125 and 128.
these code lines are all on p. 2

the message said none of them ( registers TRISB or TRISA or OPTION_REG)
are in bank0. and to check the bank selection bits.

so i did. and , by the 2001 84A data , page 7 , table 2-1 , one can read that
all 3 of these registers are in Bank 1. and the bit to select Bank 1 is bit 5 , RP0 ,
of the STATUS register. on p.8 is seen that when RP0 is '1' then Bank 1
is selected. and by line 120 of the code that bit is being set.
MAIN: BSF STATUS,5

notice too on page 7 that the STATUS register occurs in both banks

so why the build step is issuing warnings about this makes no sense.
one idea was seen in the Gooligum tutorial lessons. where the author , david, enters
a code number in the assembly file that tells the assembler to not issue these
warning messages. when i come across where i saw them i'll post it here so
you can take a look at it.

note - this example also shows one way the assembler has evolved since 2005.
then prior to coding any of the special function registers you first had to set the
STATUS RP0 bit for which ever Bank that SFR is in . nowadays you can still do
that or , instead of a line = BSF STATUS,5 , you have the choice to
enter a line of code = Banksel TRISB
and this tells the assembler for it to figure out how to set the STATUS bit.
this saves you from having to look at table 2-1 so often to find out which
Bank the SFR's are in
 
Last edited:

bob weir

Sep 10, 2014
235
Joined
Sep 10, 2014
Messages
235
feb 20 84A test ckt , data.jpg

update feb 20

this post is to alert you to the next test of the S/D asm code.

on feb 8 was posted the S/D *.asm on 4 pages. on line 138 is a comment about
the first pulse not being processed. this adds uncertainty to the code issuing a
fire pulse out of pin A2 with 2 B0 input pulses.

despite that the uC will be given 2 pulses out of the 509 A0 pin into pin B0 to
mimic what it gets from the flywheel.

.... we already know that it emits a A2 pulse with a steady stream of B0 pulses.
the jan 27 post showed the results of that test.

what we will learn is if an A2 pulse follows only 2 or 3 B0 pulses.

for my other CDI ignition project a fire pulse follows the first engine input pulse.
this fact is left with the reader to ponder

the 509 is coded to deliver 3 pulses in a row out of the A1 pin too.

the other critical thing the 509 code has to do is space the pulses to be in the
RPM range the 84A code is designed to detect . 5 values are selected to cover
both sides of 5000 RPM. the last column of the table in the scan is the number of
times a 128u sec subroutine has to loop to make the pulses 360 degrees apart
at that particular RPM.

for instance at 3600 RPM it takes the flywheel .017 sec to spin once.
that's a long time. and .017 / 128u = 130

the scope will be used in 'single' mode as the 509 is coded to run one time thru
the code then stop , not loop. then the time from the first B0 pulse to an A2
pulse will be measured. with this measure and the known spacing of the
B0 pulses the firing angle can be calculated.

when i have the test results they will be posted. along with the 509 asm code

............
 
Last edited:

bob weir

Sep 10, 2014
235
Joined
Sep 10, 2014
Messages
235
DS1Z_QuickPrint7.jpg

feb 24 ..... update on review of the S/D 84A ignition system and its asm code

this screen shot off the scope is of some 509 code.

the code is 'signal' code. until now the 16F506 has been a source of
test signals. only its operation has been erratic and unreliable of late.
so its being set aside until there is spare time for it to be re-built

the price one pays for switching is having to code the 509 for each individual test RPM .
both the 509 and 506 are baseline uC's. but the 509 lacks an ADC module

about the traces ... CH2 with the 3 spikes are coming out of 509 pin A5
and the 2 CH 3 spike/'pulses are out of A4. the spacing is for about 6000 RPM.
6000rpm = 100Hz. thus one rev takes .010 sec
the 509 signal asm subroutine is 128u long. and it is looping 100 times ... ca. .0128 sec.

these pulse's purpose is to test the S/D 84A code. and learn if the 84A uC will
emit a 'fire' pulse with just 2 input pulses. and if not 2 then with 3.

it should. as that is basically all the code does. read time between 2 signal
pulses off the flywheel. crunch the numbers, fire the spark . and repeat

they are spaced apart time-wise for one revolution of the flywheel.
note too that H = 5.00ms . thus the screen is showing us .060 sec worth of signals.

and we'll need more screen space as the RPMs drop and the 360 rev time increases.
one RPM under 5k needs tested too , as a minimum.

see the image top line RIGOL etc... and the section with the sinewave in shaded and
clear background. not sure but suspect it tells us how much more memory there is
available . not being used. with my cm ruler the light to dark is about 1:1
thus we have another .060 sec of time to record the slower signals under 6000 rpm

this 0-1-0 polarity sequence will be tested as-is. and if no fire pulse
emerges the signals will be run thru a 7404 inverter chip.
 
Last edited:

bob weir

Sep 10, 2014
235
Joined
Sep 10, 2014
Messages
235
84A ckt diag 'n plan  mar 3.jpg

an alternative circuit is to use all 8 PORTB pins each with a led. this could be done.
the penalty is only seeing one hex byte variable at a time. and , worst of all,
it means upwards of an extra 100ma of current flowing thru the uC.

the 74164 circuits are powered separately . and all the led current is not
'seen' by the 84A . thus the switching on and off of the leds will not
reflect any surges on the 84A's +5V or gnd bus on the ckt bd.bd.

if these circuits were on printed circuit boards with there extensive and
continuous copper traces it would not be such an issue.

note that each 74164 circuit uses 3 pins : data , clock and clear.
and if you want to the clear pin can be omitted. thus for the cost of
2 pins on a 84A one can gain a peek at the inner asm code workings
during run time. and given this chip has 13 i/o pins available :
porta 0-4 (5) & portb 0-7 (8) ... and we are using only 10 in the ckt diag
posted here ... that leaves 3 more available. so if one wants to put
together 1 more 74164 circuit then we could see 3 variables at a time.

one last problem to solve for this to work is where to put the 'serout' code
for all of these 74164's so that it doesnt interfere with the timing and flow of
the original S/D asm code.

someone may think that the /mclr pin could be used if it was coded to be 'off'.
and they are right. we could reset the chip using the +5 volt supply and some
added code at the start , say 15 ms of delay, to allow for contact bounce.
..... the gain for going this route is one more 2-pin ( data & clock ) 74164 ckt.
giving us 4 variables of vital information for each 2 or 3 flywheel input pulses.
i.e. a code test would be to apply 2 or 3 pulses at a known spacing and then
see what the value of the chosen variables is. record these numbers. then
rotate the pot knob for the next RPM test number. cycle +5V power and see what
numbers are on the 74164 leds.

a visit to the other ignition project was just taken to find a posting of code
and a circuit for a 74164.. not found. so one will be posted here .
meanwhile if you have access to the book "PIC'n up the PACE" by david
benson '99, you'll find it all there on page 14 - 17.
 
Last edited:

bob weir

Sep 10, 2014
235
Joined
Sep 10, 2014
Messages
235
mar 7
the last post on mar 3 needs some editing. on the topic of using the MCLR pin once it is
configured _OFF . this pin is input only. and we can still have 4-74164 circuits. to do this
the FW ( flywheel ) pulse into pin B0 will have to be re-routed to pin 4. and then pin B0
will be TRIS'd as an output. so it can be 1 of the 2 output signals the 4'th '164 needs.

another edit is for paragraph 6. where a 'pot knob' is mentioned. this pot and knob are
on a '506 circuit that is supplying the pin B0 flywheel pulses input signals.

examples of such a circuit are found on my other cdi ignition project posting of this forum
 
Top