Maker Pro
Maker Pro

Inverter Generator won't produce power

kingfishbc

Jul 14, 2014
6
Joined
Jul 14, 2014
Messages
6
I'm both a newbie here and pathetically under-educated in electronics and electricity. But I think I am teachable, and I am asking for help in trouble shooting an inverter generator that won't produce power. I hope I am at least remotely in the right place...

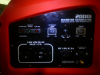
The I/G is a Honeywell HW200i that was given to me by a friend in return for a favor I performed. He bought the genset on Amazon about 5 years ago and never used it; never started it, never even fueled it. I took it home, fueled it up, checked the oil, followed the instructions and started it. It ran slowly, obviously way below the 5000 RPM on the face plate, whether in or out of "efficiency" mode, and the power light never lit so I believe it was not producing power. Anyway, I thought maybe an inverter generator needs to have a complete ground system to operate correctly, so I shut it down, and drove and connected a ground rod.

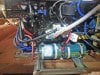
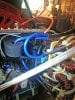
Then I couldn't get it to re-start, no matter what I did. So I figured out how to remove all the plastic cladding, and removed, dis-assembled and cleaned the carb. After I re-assembled and re-installed the carb, it started and ran, this time in what sounded to me like the appropriate RPM range, and it backed down in the efficiency mode and came back up to higher RPM upon turning the efficiency mode off. But it didn't produce power. The green light on the control board indicating power production didn't light and an electric drill motor plugged into either AC outlet didn't run.

So I googled the Honeywell HW2000i and found it has its share of problems, in initial starting, re-starting, producing power, made in China, poor or non-existent dealer/rep;air network, etc. I read that sometimes a new I/G arrives with a broken AC breaker, so I procured a new one and put it in with no joy. I read that sometimes small generators (not sure if that includes inverter generators or not) lose magnetism when not started over a period of time,and need to be re-flashed by hand spinning an electric drill motor plugged into one of the receptacles while the unit is running. Tried that, no joy. I understand there is a more complex method of re-flashing involving hooking up 3 light bulbs in series with a male plug in each end of the wires, starting the ailing genset, plugging in one of the male plugs to a receptacle thereon and plugging the other end into an active AC source like another generator. I have a diagram to build one of these and understand how to do it and how to use it, but I still don't know if the magnet flashing deal is only for a standard generator, or for an inverter generator, too. I don't want to inadvertently ruin something that is not already ruined.

The dam thing starts and runs just as sweetly as you could ever hope for, and I don't want to give up yet. Can anyone here weigh in on the flashing issue, and/or what else I can test and/or replace to make this a functioning inverter generator?

Thanks in advance,
John
 

Gryd3

Jun 25, 2014
4,098
Joined
Jun 25, 2014
Messages
4,098
http://www.yamahaef2000is.com/conventional_generator_vs_inverter_generator.html

Here is the difference between an older tech Generator and your model...
Old generators were simple, and the windings connected directly to the output. This generator's windings are connected to a rectifier which is fed into the inverter, which in turn generates the 110V output desired.
The advantage with this new tech is that the engine speed will not alter the phase of the generated power, the disadvantage is that now there is added complexity.

By plugging in the drill and manually turning it, you are forcing a voltage into the output of the inverter. This could very well damage the inverter (further). Do NOT try the 3 lightbulb method.
I am unsure on your mechanical/electrical skills, but you should start from the ground up... If you have voltage on the windings that feed to the inverter, then you know the inverter is at fault. (Or something else between the windings and the output)
Otherwise, we will need to take a crack at the inverter and find out why it is not taking the messy electricity from the motor and converting it to a nice clean usable 100V AC supply.

Edit: You are dealing with potentially lethal electronics. ANY work you do should be done with a spotter, and ideally researched prior to help prevent mishaps. No one on the internet is liable if you hurt yourself!
 

kingfishbc

Jul 14, 2014
6
Joined
Jul 14, 2014
Messages
6
http://www.yamahaef2000is.com/conventional_generator_vs_inverter_generator.html

Here is the difference between an older tech Generator and your model...
Old generators were simple, and the windings connected directly to the output. This generator's windings are connected to a rectifier which is fed into the inverter, which in turn generates the 110V output desired.
The advantage with this new tech is that the engine speed will not alter the phase of the generated power, the disadvantage is that now there is added complexity.

By plugging in the drill and manually turning it, you are forcing a voltage into the output of the inverter. This could very well damage the inverter (further). Do NOT try the 3 lightbulb method.
I am unsure on your mechanical/electrical skills, but you should start from the ground up... If you have voltage on the windings that feed to the inverter, then you know the inverter is at fault. (Or something else between the windings and the output)
Otherwise, we will need to take a crack at the inverter and find out why it is not taking the messy electricity from the motor and converting it to a nice clean usable 100V AC supply.

Edit: You are dealing with potentially lethal electronics. ANY work you do should be done with a spotter, and ideally researched prior to help prevent mishaps. No one on the internet is liable if you hurt yourself!

Thanks Gryd3, both for the reply and for the warning.

I have done a fair amount of wiring, both house wiring (connected to the grid) and camp wiring (multi-building, 110V AC genset power and 12V DC solar), and have messed around a lot with various pieces of equipment attached thereto. I have survived 66 years and intend to make it a fair piece more. But I have not done very much on the inside of generators short of running the troubleshoot tree on our old Onan diesel genny. I am mechanically inclined, both genetically and by practice; I consider myself a born problem solver. So I won't necessarily know exactly how to check voltage on the windings, but I have a Fluke 88 multi meter with a number of accessories and I will find out how to.
 

Gryd3

Jun 25, 2014
4,098
Joined
Jun 25, 2014
Messages
4,098
Thanks Gryd3, both for the reply and for the warning.

I have done a fair amount of wiring, both house wiring (connected to the grid) and camp wiring (multi-building, 110V AC genset power and 12V DC solar), and have messed around a lot with various pieces of equipment attached thereto. I have survived 66 years and intend to make it a fair piece more. But I have not done very much on the inside of generators short of running the troubleshoot tree on our old Onan diesel genny. I am mechanically inclined, both genetically and by practice; I consider myself a born problem solver. So I won't necessarily know exactly how to check voltage on the windings, but I have a Fluke 88 multi meter with a number of accessories and I will find out how to.
Sounds good. These steps will involve a little more disassembly.
Basic description based more or less on assumptions (100% assumptions).
Take a look at the electrical connections, the 110V AC plug will lead you directly to the inverter board. This board will have an additional set of wires that lead to the actual 'generator' part of the machine.
This is why I posted my warning.. start the machine and with your meter set to AC, test these lines that lead into the board. I am unsure what voltage you should expect, but you should most likely expect 3 pairs of wires leading to either the inverter board, or to a rectifier before being fed to the inverter on a pair of wires.
The wires from the generator will be AC, be cautious and expect higher than 110V.
The next step is looking at the inverter board for signs of failure.

Pictures would come in very handy, as it would help eliminate any guess work.
 

kingfishbc

Jul 14, 2014
6
Joined
Jul 14, 2014
Messages
6
I will pull the control panel off, and if my rights here as a newbie allow it, I'll post a photo of the backside of the panel capturing all the wiring and connectors I can.
 

Gryd3

Jun 25, 2014
4,098
Joined
Jun 25, 2014
Messages
4,098
I will pull the control panel off, and if my rights here as a newbie allow it, I'll post a photo of the backside of the panel capturing all the wiring and connectors I can.
Sounds good. If you can't get it all in one picture, get a couple. Try to get them with even light without the flash.
If it is not clear, a small write-up of where any of the wires leading away from the board go would help a great deal as well.
 

kingfishbc

Jul 14, 2014
6
Joined
Jul 14, 2014
Messages
6
Here is a photo of the front of the control panel. Upon loosening the control panel from the "box", it turns out that the AC recep is a duplex with 2 grey wires on one side which collect and go to a quick disconnect, and 2 red wires on the other side that collect and go through the AC breaker to the same quick disconnect as the grey collected wire. The quick disconnect has the collected grey wire and the collected red wire on one side, and 2 blue wires on the other side that disappear into the machine. Thus the photo of the cover; I'll have to remove the plastic box from around the machine to see where the blue wires go and to get representative photos. Gonna take a little time and will probably get interrupted by dinner...
 

Attachments

  • 2000i.control.panel.png
    2000i.control.panel.png
    1,016.9 KB · Views: 1,616

Gryd3

Jun 25, 2014
4,098
Joined
Jun 25, 2014
Messages
4,098
The pair of blue wires most like go to the Inverter board. What I would like to see/know is what else is connected to the board.

Don't rush yourself. Haste makes waste ;)

I'll take a look when I have time and hopefully give you an answer that will help lead to the culprit.
 

kingfishbc

Jul 14, 2014
6
Joined
Jul 14, 2014
Messages
6
Gryd3

I think these two files show the board you wanted to see; board.1 shows the whole board with the 2 blue wires coming from (going to) the AC recep in the upper right hand corner. Board.2 shows those 2 blue wires in the middle of the photo encased in a black sheath. This was the best I could do with the light at hand tonight; hopefully I can do better tomorrow, but maybe this will give you a notion of what things look like. I'm going to need about 6 sky-hooks to manage all the various pieces and parts if I try to take multi meter readings with the unit running. The board looks woefully un-modular...
 

Attachments

  • board.1.fxd.jpg
    board.1.fxd.jpg
    117.4 KB · Views: 2,801
  • board.2.fxd.jpg
    board.2.fxd.jpg
    184.7 KB · Views: 2,354

Gryd3

Jun 25, 2014
4,098
Joined
Jun 25, 2014
Messages
4,098
The pictures definitely help, and by the looks of things, will not be easy to work on if the components on the inverter board are to blame... Everything looks to be encased in epoxy.
Just to confirm, board 1 is more of an 'overall' image, and board 2 is a close-up of the top right corner.
Two things caught my attention.
1st, is the rather large capacitors in the bottom of the image rated for what appears to be 450V. If the generator side of this machine is still making electricity, chances are those capacitors will be packing a charge. This could very well be a test point if we can't find another. They would be measured with the meter set to DC at a higher voltage than the cap. I am nervous suggesting this as a test point as capacitors can be incredibly dangerous... I would much rather measure the AC coming from the coils.
2nd, is a group of black and blue wires in the bottom left of 'board 1'. Do you know where they go? My gut is telling me they may be coming from the coils of the generator based on the location... but the board being covered the way it is with that black gunk makes tracing the circuit and identifying many of the parts difficult.

At this point, I am unsure what to hope the problem is... There may be a method to get the magnets 'charged' again if they have weakened... but not by any of the means currently provided due to that inverter board. I would like to discourage bypassing the inverter board and trying to feed electricity back into the coils, as I do not fully understand the physics behind the methods of charging the magnets again, and an unsure if any further alterations to the method may be required.
If the problem is the board, I would not be able to suggest how you would begin to troubleshoot or repair it. When I see boards like that I tend to think it's not even remotely worth uncovering it to get to the parts. Perhaps you could be lucky though... as I see a number of wires leading 'from' the board. I am unsure what they are all for at the moment, but maybe with some luck it is a broken switch or wire leading to the control panel. (I did recommend testing these first... as a problem with the board itself could easily present you with a false positive depending on how you test them.)

If I were working on it myself, I would seriously be considering if it is worth my time to attempt to dig in deeper. If it were the board, id toss it. If it were the magnets, I would consider tossing it as I feel it is not worth the risk to try something 'new' to see if I can make an old tech fix work on modified new tech.

Perhaps another user on the forums has a brilliant idea as to something else that can be tried.
 

debe

Oct 15, 2011
278
Joined
Oct 15, 2011
Messages
278
Its unlikely that the rotor has lost its magnetism will post a circuit for a Kipor inverter generator of similar type. These generators usually generate 3 phase voltage that can run as high as 400V ac to the inverter board & a low voltage winding to power the electronics. Start with, is there voltage from the hivoltage windings? More pictures may be helpful.IG2600.53.jpg
 

debe

Oct 15, 2011
278
Joined
Oct 15, 2011
Messages
278
These type of generators the only diference betwean the 240v & 120v models is the main windings & the Inverter board. On the circuit I posted the voltage shown for the main winding is for a 240V model. The 120v one will obviously be lower. These generators you DO NOT try & flash like older types.
 
Last edited:

debe

Oct 15, 2011
278
Joined
Oct 15, 2011
Messages
278
Heres the circuit from an owners manual, very typical setup for an inverter gen. Not mutch to it realy, with the engine running there should be ac voltage across each primary winding,. And voltage on the secondary winding probably around 12v. Also check that there is no poor conections & that's about it..HW2000i GEN.jpg
 
Last edited:

kingfishbc

Jul 14, 2014
6
Joined
Jul 14, 2014
Messages
6
Firstly, thank you both Gryd3 and debe for your attention and help.

Yes, wires do simply disappear into the epoxy on the face of the board, and the 2 parts that look like "D" batteries do state 450VDC on each. The blue and black wires (3 blue, 2 black, all #16) leaving the bottom left hand corner go to one side of a quick disconnect; from the other side of the quick disconnect 3 blacks (#16) and 2 whites (#18 or #20) disappear into the side of the generator case, presumably to the primary and secondary windings respectively. In this regard there appears to this naive guy that we are seeing some aspects of the HW1000i circuit diagram (3 #16) and some aspects of the HW2000i circuit diagram (4 #16) (I have both), and for whatever reason the wire colors indicated in the diagrams are not necessarily the wire colors actually in place. Given the degree to which the unit had to be dis-assembled to get to this stage and to look at the face of the inverter board, I have more than a little concern about how I will go about starting it up so any testing can be done. I may be able to clamp and/or support various parts and pieces securely onto a work bench, and make it happen though...In the event I can start it in this stage of disarray, can the voltage testing across the windings be done by penetrating the insulation of the correct wires leaving the windings with sharp probes? Or to terminals inside the quick disconnect? I would be happy to provide more photos; just let me know what you want to see.

Thanks again.
 

debe

Oct 15, 2011
278
Joined
Oct 15, 2011
Messages
278
Pretty sure the 3 blue wires are the primary windings, I would be checking at the conector, not piercing the wires. Can you acess the conector with the control panel off? If not I would run 3 temporary wires from the conector to the outside of the genny when assembled for a test.
 

Gurden Smith

Dec 1, 2017
1
Joined
Dec 1, 2017
Messages
1
I have a HW2000i sames as kingfish. My problem is a little different. Voltage output is 103.5v 60cycles with the green light on is the inverter voltage output adjustable? Do I have low voltage on one of the input legs to the inverter?
 

debe

Oct 15, 2011
278
Joined
Oct 15, 2011
Messages
278
Theres 2 adjustments on the Inverter, maybe one of these will adjust the voltage. Most Inverters ive seen don't have any adjustments.HW2000i GEN.jpg
 

mr fixit

Jun 23, 2013
15
Joined
Jun 23, 2013
Messages
15
Not sure if this was mentioned earlier, but is there output at the 12 Volt charging port when it's running?
If there is, then we can assume it doesn't need remagnetisation.
Next, as soon as you can after it has been running, measure the voltages on those two capacitors (the big blue devices strapped in with cable ties). The voltage there should be around 200 ish volts, but anything would be good.
As has been said, be careful. Set the Fluke to the highest DC volts range, and make sure your probes are good, well insulated and your hands cant slip off.
Ot looks to me that the two caps are connected in parallel, "head to head". This will make it even more difficult to get the probes in there without zapping something). Usually caps in this situation would have "bleeder" resisters connected across the terminals to drain off the volts when its not running, but sometimes they dont... So hence you try to measure the voltage as soon as possible after switch off (assuming you cant get to the terminals while its running).
Also, in board 1 picture, what is the orange wire at the top, loosely connected to a rusty screw? Is that a disconnection to allow you access?
And... When you were dismantling, did the insides look new and untampered with?
 

Jsanford

Aug 8, 2018
7
Joined
Aug 8, 2018
Messages
7
So i see this is an old post but seems to be a lot of knowledge in here, i have a generac with a failed inverter board, has anyone tried sacrificing a small automotive power inverter in place of the $700 inverter board?
 

kellys_eye

Jun 25, 2010
6,514
Joined
Jun 25, 2010
Messages
6,514
The 'motor generator' part of the device must have a voltage of some kind coming from it. If that voltage can be converted to something a standard inverter can use then there is no reason why you can't do the substitution as you suggest.

Do you know what the motor-generator side actually puts out? I suspect it won't be anything 'normal'.
 
Top