Maker Pro
Maker Pro

Treadmill Motor Controller Board issue

Waleo27

Jul 17, 2017
14
Joined
Jul 17, 2017
Messages
14
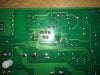
My Nordic track treadmill has failed on power-up and produced a slight burning smell. I had a look inside and couldn't see anything obvious. I called out a treadmill engineer and he said it is a problem on the Motor controller board. He has quoted me over £200 pounds to repair which I really can't afford. However as the machine is only about 5 years old and cost nearly £2000 I would really like to try and resolve it. The engineer showed my wife (I was out or I would have asked him what it does) the part that has gone. I was wondering if anybody out there can tell me what this is, what it does and if it is easy to replace/repair? I can solder but that is about the extent of my electrical skills/knowledge! I have tried to photograph the part as best I can. It is the black metal piece which sticks up (with slots in the side). It looks like the bottom bit is plastic (joining to the metal) near the circuit board has broken off (possibly a bit charred down there as well but hard to see). Any help gratefully recieved.IMG_1351 - Pic1.JPG IMG_1348 - pic 2.JPG IMG_1350 - Pic 3.JPG
 

Minder

Apr 24, 2015
3,478
Joined
Apr 24, 2015
Messages
3,478
The metal with slots is the Heat sink for the semi conductor screwed to the side, these (semi's) are the first suspects,
Also the semiconductors on the large aluminum H.S. are also the first to be checked.
IIRC the ones on this unit are Mosfets, the number is on the front of the semi conductor.
M.
 
Last edited:

Waleo27

Jul 17, 2017
14
Joined
Jul 17, 2017
Messages
14
Thanks Max, that is really helpful. On close inspection it is indeed one of these semi conductors that has blown. Unfortunately the plastic has cracked off it so I can't see all of the writing. I can make out G6653 with a 17 and a 12 below but not the numbers/letters above it. It looks like there are 5 prongs going into the board - 3 straight in and two at angles. Do you have any ideas what the part I need is? Looks like it would be easy enough to replace (even with my basic skills!). I guess the other question is, is it likely to be the cause or a symptom? The engineer mentioned that a new filter could be in order as well. Thanks again for your help...Jon
 

Minder

Apr 24, 2015
3,478
Joined
Apr 24, 2015
Messages
3,478
The general causes are tight belts or loading, voltage spikes etc but hard to tell, generally the motors themselves do not cause that much of a problem, you could check the brushes, also any shorts can usually be seen by running the motor on an automotive battery.
M.
 

Waleo27

Jul 17, 2017
14
Joined
Jul 17, 2017
Messages
14
Thanks again. In the first instance do you thik I should just try swapping that semiconductor for a new one?
 

kellys_eye

Jun 25, 2010
6,514
Joined
Jun 25, 2010
Messages
6,514
Regardless of the fault 'as is' you have to consider what CAUSED the fault in the first place as simply replacing the burned out part may just cause it to happen again.

If you could make some clearer pictures of the circuit boards we may be able to offer some further advice.
 

kellys_eye

Jun 25, 2010
6,514
Joined
Jun 25, 2010
Messages
6,514
I'll add to this and say that I've seen, read and commented on these treadmills for faults on multiple occasions. It doesn't hold them in good light to be 'constantly' breaking down as they appear to do.
 

Waleo27

Jul 17, 2017
14
Joined
Jul 17, 2017
Messages
14
IMG_1354 - Pic 5.JPG Thanks for contributing. I've tried to get a clearer image of the board for you.
IMG_1353 - Pic 4.JPG
I've also managed to unscrew the filter the engineer mentioned and photograph the spec.

Excuse my ignorance on these things but is it possible that it is just a semiconductor that has failed or is this nearly always a symptom of something else?

Agree with your breaking down comment. Although I also have to take some responsibility as I've not serviced the machine and it has heavy usage.

Cheers...Jon
 

Minder

Apr 24, 2015
3,478
Joined
Apr 24, 2015
Messages
3,478
Often service (or lack thereof) is a cause for example not lubricating the belt as needed.
M.
 

kellys_eye

Jun 25, 2010
6,514
Joined
Jun 25, 2010
Messages
6,514
Without making some test it is impossible to say whether it is just a semiconductor failure or as a result of some other cause.
This is usually why, when we buy spares, we buy TWO!
The potentially blown part is either a switching transistor (likely) or a regulator. Again, the pictures aren't close enough or clear enough (bright) to tell.

The device you link to is the correct part (presumably) but it may have failed due to a short circuit somewhere further down the line or as a result of a fault before the device.

Given that it's blown its guts out - indicating a short circuit - you would need to make some checks and tests before simply slapping in the replacement and switching on!
 

Minder

Apr 24, 2015
3,478
Joined
Apr 24, 2015
Messages
3,478
Thanks again. In the first instance do you thik I should just try swapping that semiconductor for a new one?

If you change it, you could initially place a 240v lamp in place of the motor and see if it lights with nothing else untoward happens.
If the lamp light then try the motor.
M.
 

Waleo27

Jul 17, 2017
14
Joined
Jul 17, 2017
Messages
14
So I've just removed the old blown semiconductor and replaced it with a new one. Put the MCB back in the machine, carefully wired it all up and...nothing. The part has not blown again but the machine has not come back to life. Disapointing! Don't really know what to do or try next short of buying a brand new MCB.
 

kellys_eye

Jun 25, 2010
6,514
Joined
Jun 25, 2010
Messages
6,514
Can you get a close up picture of the board area around that device? Decently illuminated too?

Download the data sheet for the device http://pdf1.alldatasheet.com/datasheet-pdf/view/118693/ETC1/STRG6653.html and you can see the basic interconnect for the component and the areas in which other faults can occur - also how to decide where to test for faults.

Daunting - if you can't read schematics (particularly 'incomplete' advisory ones as the datasheet is) - but it gives the experience tech an idea of what to do next.
 

Minder

Apr 24, 2015
3,478
Joined
Apr 24, 2015
Messages
3,478
This version appears to have a isolated low voltage supply, you could measure some of the points marked TP, there are a few on the board, also measure the output of the bridge rectifier DB1 on the heat sink,
M.
 

Waleo27

Jul 17, 2017
14
Joined
Jul 17, 2017
Messages
14
Thank you both for your replies. I feel beyond replacing that part I am probably going to be out of my depth and may just have to buy a new board but I'm willing to try anything else you might be able to recommend. I've tried to get a few more shots for you in case you spot something.
One thing I did notice is that one of the black cylinder components (sorry I really am quite ignorant!) has a bit of exposed copper wire at the bottom (I've tried to photograph it). Should this be the case or is this a sign of something else having blown. I do have a voltmeter if you want me to test anything.

Pic 1 is the semiconductor I replaced. Pic 2 is the area around it. Pic 3 is that black component with the exposed wire at the base (has 120k written on the top of it). Pic 4 is the back of the board (the rougher soldering is where I replaced the semiconductor).


Pic 1.JPG Pic 2.JPG Pic 3.JPG
 

Attachments

  • Pic 4.JPG
    Pic 4.JPG
    279.5 KB · Views: 109

kellys_eye

Jun 25, 2010
6,514
Joined
Jun 25, 2010
Messages
6,514
L1 and C7 look stressed to me... indicative of problems other than that caused by the original device blowing up!

TBH the fault finding/repair process is beyond your limited capabilities so unless you;re prepared to send the board off to someone willing to have a closer look then the safest solution would be to fit a replacement.
 

Waleo27

Jul 17, 2017
14
Joined
Jul 17, 2017
Messages
14
I think you are probably right. Shame as the MCB replacement is pretty expensive.

Minder, is it worth me taking any readings with the Multimeter or is that only going to reveal other issues which I'm not going to be able to sort out myself?
 

Minder

Apr 24, 2015
3,478
Joined
Apr 24, 2015
Messages
3,478
Taking reading are the main way to diagnose the fault, but you have to be able to analyze the results depending on the circuit/component you are taking the reading on.
The main areas are power supply(s) and power semiconductors, large wattage resistors etc.
Also by observation as to parts that appear to have been stressed.
Also check to see if the motor has any kind of rpm detection such as slotted wheel or magnetic sensor on one end of the shaft..
Unfortunately this is one of the boards I have been unable to find a circuit for, reverse-engineered or not.
M.
 

Waleo27

Jul 17, 2017
14
Joined
Jul 17, 2017
Messages
14
Thanks anyway. I really do appreciate the help of you guys. Just wish I knew more about this stuff! I'll take some readings and get back to you. Just in case.
 
Top