Maker Pro
Maker Pro

Rewiring 7-band EQ

whiterabbit

Sep 14, 2013
90
Joined
Sep 14, 2013
Messages
90
Dear The Internet, I need your help!!

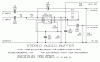
I was given an old car EQ from the 80's. It is a "Realistic Stereo Frequency Equalizer", model 12-1867.

Assuming it still actually works, my end goal is to rewire it to be powered by an outlet instead of a car battery. I know I will need a converter, but am not sure how to integrate that. One step at a time though...

The biggest problem I'm facing at the moment is that the power inputs were ripped off- so I'm not sure which voltage each wire needs, nor do I understand how I would test for that other than starting with a low voltage battery and incrementally adding more batteries until it started working. That seems both inefficient and possibly dangerous to the device.

I'm guessing it would be cheaper, faster, safer- to just go out and buy a new modern EQ. However, I'd feel much more satisfied if I could get this old broken one to work.

SO- with that in mind, where do I start? Any input would be much appreciated :)

(Also, I was able to find more pictures of an unbroken model on this eBay listing http://www.ebay.com/itm/Very-Old-Sc...D&orig_cvip=true&rt=nc&_trksid=p2047675.l2557)
 

Attachments

  • IMG_0995.jpg
    IMG_0995.jpg
    138.5 KB · Views: 1,556
  • IMG_0994.jpg
    IMG_0994.jpg
    151.4 KB · Views: 437
  • IMG_0997.jpg
    IMG_0997.jpg
    147.6 KB · Views: 1,145
  • IMG_0996.jpg
    IMG_0996.jpg
    144.1 KB · Views: 1,408

(*steve*)

¡sǝpodᴉʇuɐ ǝɥʇ ɹɐǝɥd
Moderator
Jan 21, 2010
25,510
Joined
Jan 21, 2010
Messages
25,510
Dear user of internet,

It is likely (but by no means certain) that the red and black wires are the power connections.

You would need to provide them with 12V DC -- but DON'T DO IT YET.

First you need to confirm this.

The tests I would do are to measure the resistance from each of the leads to both the ground connections of the RCA inputs, and to the metal case. (tell us what they are).

Then show some nice clear images of where the wires connect inside the unit.

The ebay auction shows pretty clearly the red lead has a 4A fuse in it, and so that's a great indication that it's the +ve power lead.

Why not get in contact with the seller of that unit and ask if he can tell you what the wires are used for? That would be the most direct option.
 

whiterabbit

Sep 14, 2013
90
Joined
Sep 14, 2013
Messages
90
Thank you for your prompt response! Tomorrow morning I will attempt to measure the resistance between the leads and the RCA inputs/case. I will also attempt to contact the manufacturer and see if if they have any information that might be of assistance.

I WAS able to connect a 3v battery pack to the black and red (ground and pos) and light up the power LED; so that, at least, is functioning.

I will reply in the morning with what I've found with regards to resistance, and include some more specific pictures.
 

whiterabbit

Sep 14, 2013
90
Joined
Sep 14, 2013
Messages
90
Update!

Here's what I've come up with so far:

Using an Extech MN35 multimeter I got these readings-

HTML:
Lead          Setting          Gnd          Case     

Gray          2v              .263-.267     .253-.258
Green         200mv           46.0          45.8
White         200mv           45.5          45.4
Brown         2v              .25           .249
Orange        200mv           19.6          19.6
Red           2kOhm           19.6          19.6

While taking the readings I noticed that the output would steadily decrease the longer I had the leads clipped on- is that normal?

For the orange and red wires the output numbers were so low that in order to actually figure out what it was saying before it dropped down to 0 I had to repeatedly flip the dial to and from the 200mv/2kOhm settings so it would read 1, and then bring back the actual reading. Hopefully that makes sense. Maybe I'm not using the multimeter properly.

Here are more pictures; I also managed to scrounge up a schematic.

Also, as suspected the black wire IS labeled 'GND' where it attached to the board.

The orange and red leads both connect to the power button on the same post. The other set of posts on the power button have red wire coming from them, one going up to the power LED and one going down into the board itself.
 

Attachments

  • IMG_1006.jpg
    IMG_1006.jpg
    146.5 KB · Views: 451
  • IMG_1008.jpg
    IMG_1008.jpg
    136.3 KB · Views: 706
  • IMG_1010.jpg
    IMG_1010.jpg
    139.3 KB · Views: 399
  • IMG_1011.jpg
    IMG_1011.jpg
    142.5 KB · Views: 640
  • 12-1867.pdf
    54.2 KB · Views: 214

KrisBlueNZ

Sadly passed away in 2015
Nov 28, 2011
8,393
Joined
Nov 28, 2011
Messages
8,393
You need to measure resistance on all those wires. Measuring voltage won't tell you anything. (Measuring resistance probably won't tell you much either.)

From the schematic, it looks like four of those wires (brown, grey, white and green, I think - the schematic is blurred) are used for external high-level inputs, probably from loudspeaker outputs. They are shown at the top of the schematic, connecting to a five-pin connector. I guess this is for use with an existing radio with loudspeaker outputs only.

If you're using line level signals into and out of the RCA Phono connectors on the back, you don't need to use those wires. For each one, strip some of the insulation back, twist the exposed wires, grab them with pliers, and pull the insulation back as hard as you can. Then cut the wires flush with the insulation. When you let go of the insulation, it will stretch back and cover the wire like a foreskin! Then wrap them tidily in electrician's tape.

That leaves only orange and red. I think these are two of the four wires shown at the bottom of the schematic. Turn the equaliser power switch ON and measure continuity or resistance from red to orange. Probably you will read a short circuit or zero ohms. If so, one of them is the power input before the ON/OFF switch, and one connects after the switch. Put +12V onto either one, and see whether the ON/OFF switch does anything. If it doesn't, use the other one.
 

whiterabbit

Sep 14, 2013
90
Joined
Sep 14, 2013
Messages
90
First things first- this is literally the first time I've used my multimeter... and it sounds like I used it to measure the wrong thing- is that right? Measuring voltage instead of resistance. I just want to make sure I'm using my tools properly in the future. So the markings like 600V, 200V, 20V etc., measure... how much voltage a circuit can handle...? And then the markings such as 20M Ohm, 200k Ohm, are used specifically to measure resistance? Total n00b status here, sorry.

So, to make sure I understand what you're saying- the only wires I probably need to worry about are either the orange or red wire- which supplies the +12v current; the rest don't have anything to do with supplying power to the EQ.

BOTH the orange and red leads attach to the same post on the on/off button- so that being the case, it shouldn't matter which one I run the current into... right?

Then from there, it's just a matter of plugging the RCA cables in and things should just work?

My intention is to hook this up to an old Magnavox record player. It has it's own amplifier and everything, so I should just be able to plug the EQ in between the amp and the speakers. At least... as far as I understand it.
 

KrisBlueNZ

Sadly passed away in 2015
Nov 28, 2011
8,393
Joined
Nov 28, 2011
Messages
8,393
First things first- this is literally the first time I've used my multimeter... and it sounds like I used it to measure the wrong thing- is that right? Measuring voltage instead of resistance. I just want to make sure I'm using my tools properly in the future. So the markings like 600V, 200V, 20V etc., measure... how much voltage a circuit can handle...? And then the markings such as 20M Ohm, 200k Ohm, are used specifically to measure resistance? Total n00b status here, sorry.
Yes, you're right, except that when you measure voltage, you are measuring the voltage that is PRESENT between two points in a circuit, not how much voltage it can "handle".

Voltage is measured between two points, by setting the multimeter to a voltage range and connecting the probes to two points. For example you can measure the voltage across an AA battery.

Resistance is also measured between two points.

So, to make sure I understand what you're saying- the only wires I probably need to worry about are either the orange or red wire- which supplies the +12v current; the rest don't have anything to do with supplying power to the EQ.
Right.

BOTH the orange and red leads attach to the same post on the on/off button- so that being the case, it shouldn't matter which one I run the current into... right?
Right again.

Then from there, it's just a matter of plugging the RCA cables in and things should just work?
My intention is to hook this up to an old Magnavox record player. It has it's own amplifier and everything, so I should just be able to plug the EQ in between the amp and the speakers. At least... as far as I understand it.
No, you can't do that.

The equaliser operates at "line level". The input and output signals are low-power signals. Like the signals you get out of the RCA Phono sockets on the back of a CD player.

The signals used between an amplifier and a speaker are high-power, low-impedance signals. A speaker needs a lot of power to make a lot of noise. The small low-power signal that comes out of the equaliser cannot drive a loudspeaker.

You need to connect the equaliser IN BETWEEN the line-level signal source and the power amplifier. Here's the original arrangement:

Pickup ---> Preamp --------[line-level signal]------> Power Amp --------[high-power signal]-------> Speaker

The very low-level signal from the pickup is amplified and equalised (to compensate for the way the vinyl was recorded) and becomes a line-level signal. It then feeds into the power amplifier, which drives the speakers. Here's what you need to do:

Pickup ---> Preamp ----[line-level]---> Equaliser ---[line-level]---> Power Amp ----[high-power]----> Speaker

Most likely, your record player has an internal connection between the output of the preamp and the input of the power amp. If so, you'll need to modify it, so you can insert the equaliser into the signal path. You can probably do this at the volume control.

There are probably two twin screened cables with their inner conductors connecting to four pins of the volume control potentiometer. The other two pins will be earthed to the chassis. You need to disconnect those wires and route them to connectors that can be wired to the RCA Phono sockets on the back of the equaliser.

The two wires that go to the two end pins on the volume potentiometer are the left and right outputs from the preamp; these need to be connected through to the input connectors on the equaliser. The outputs from the equaliser need to be connected through to the other two wires, which are the input to the power amplifier.

Post a photo of the insides of the record player and especially the volume control.
 

whiterabbit

Sep 14, 2013
90
Joined
Sep 14, 2013
Messages
90
Thank you- you've explained that brilliantly!

Alright, so as for the record player... I've already removed the electrical components so I could properly clean them, and to prepare them for their new home which is currently mid-fabrication. Basically everything is sitting on a shelf in a pile of wires and tubes. So some of these pictures are from before I started removing everything, excuse the dust.

I am also including the original schematic for the record player.

The second and third pictures are the input/output section of the panel that houses the volume pot.

So to make sure I'm understanding: once I get the EQ up and running, it should go BEFORE the amplifier, so that the line-level *equalized* signal then gets amplified and output to speakers, instead of equalizing an already amplified signal.

If I got that right, then I would run the 'violet / yellow' cables into the EQ jacks, and then run a second set of RCA cables from the EQ output jacks into the amplifier panel into where the violet/yellow USED to connect. Correct?

As for powering the EQ itself.... http://www.neweggbusiness.com/Product/Product.aspx?Item=9B-17-394-155 I was hoping that something like this, properly wired, could be the power source instead of having to use batteries. Would that be problematic?
 

Attachments

  • IMG_0979.jpg
    IMG_0979.jpg
    149.6 KB · Views: 382
  • IMG_1014.jpg
    IMG_1014.jpg
    149.1 KB · Views: 289
  • IMG_1015.jpg
    IMG_1015.jpg
    147 KB · Views: 309

KrisBlueNZ

Sadly passed away in 2015
Nov 28, 2011
8,393
Joined
Nov 28, 2011
Messages
8,393
So to make sure I'm understanding: once I get the EQ up and running, it should go BEFORE the amplifier, so that the line-level *equalized* signal then gets amplified and output to speakers, instead of equalizing an already amplified signal.
Right.
I am also including the original schematic for the record player.
That diagram is helpful but there's not enough detail for me to be sure of anything.

It raises a new issue though: the record player uses valves (tubes). This will probably be a problem because tube circuitry operates at high impedance. This means in simple terms that the signals are very weak and not compatible with solid state circuitry unless a circuit called a "buffer" is connected between the preamp output and the input of the graphic equaliser. Without a buffer, you will lose most of the signal, especially the bass. No special circuitry is needed between the equaliser output and the power amplifier input though.

You can build a buffer using a dual op-amp (see http://www.digikey.com/product-detail/en/MC34072PG/MC34072PGOS-ND/919075) on a piece of stripboard with a few resistors. It could be powered from the 12V supply that you use for the graphic equaliser.

The second and third pictures are the input/output section of the panel that houses the volume pot.
OK. I really need more information. Can you show a series of photos, starting with one showing everything inside the record player and progressively focussing on the relevant parts? Also I would like to see the connections to the actual volume pot.

Can you get any more information on the record player? An actual schematic, showing how all the tubes are connected to all the small components, would be great.

If I got that right, then I would run the 'violet / yellow' cables into the EQ jacks, and then run a second set of RCA cables from the EQ output jacks into the amplifier panel into where the violet/yellow USED to connect. Correct?
I'm not sure. Need more information.

As for powering the EQ itself.... http://www.neweggbusiness.com/Product/Product.aspx?Item=9B-17-394-155 I was hoping that something like this, properly wired, could be the power source instead of having to use batteries. Would that be problematic?
That looks OK. You may need to add filtering on the output of that power supply. There are two types of adapters: transformer-rectifier types (the older, heavier type) and switching supply types (modern, lightweight and compact). Both types have noise on their outputs which can cause problems with audio circuitry but this noise can be filtered out.
 

whiterabbit

Sep 14, 2013
90
Joined
Sep 14, 2013
Messages
90
First, I just want to start with a massive THANK YOU for putting time into answering my questions and being willing to explain how I'm making mistakes instead of just telling me I'm wrong. I greatly appreciate it!

Alright, I looked over the body of the cabinet, and the manual, and wasn't able to find an exact model number for the record player. I did some googling, and was able to locate pictures from extremely similar models from the early 60's, but not the exact model that I have. With that being the case, I haven't been able to find a schematic. I will keep looking though!!

Alright- more pictures...

These were taken before I removed everything from the cabinet to be cleaned.

Green/black wires run from the record player to the panel with the pots attached (I will call it the control panel). They input into a section labeled 'phono input', with green being channel 2 and black being channel 1.

The red wire, labeled TV, runs into the smallest metal panel as input.

From there... the brown and blue wires originate from the smallest metal panel (Ch1 and Ch2) and run back into the control panel.

The brown wire connects in between green and black, and is also labeled channel 1.

Directly next to that is the label 'FM Stereo In' and the blue wire connects under 'channel 2'.

From the control panel, the yellow and purple wires (labeled audio output) run into the largest metal panel. From which run the orange and brown wires which go to the speakers.

Pots are Bass, Trebel, Volume, Input selection, and Tuning.

IMG_0968.jpg

IMG_0970.jpg

IMG_0972.jpg

IMG_0978.jpg

IMG_0971.jpg
 

whiterabbit

Sep 14, 2013
90
Joined
Sep 14, 2013
Messages
90
Trying to post more detailed images, but am getting some server errors... so more pictures to come as soon as I can get them uploaded.
 

whiterabbit

Sep 14, 2013
90
Joined
Sep 14, 2013
Messages
90
Alright... seems to be working now!

Just to be clear, the volume pot is the middle one of the group on the control panel- which is the only one that you can see the guts of.

Also, I realized I have some op amps from another project that got side tracked.

I have 2 of these... http://www.ti.com/product/lm358-n Would those be fitting for a buffer?
 

Attachments

  • IMG_1020.jpg
    IMG_1020.jpg
    148.1 KB · Views: 278
  • IMG_1021.jpg
    IMG_1021.jpg
    152.7 KB · Views: 238
  • IMG_1022.jpg
    IMG_1022.jpg
    136.1 KB · Views: 250
  • IMG_1023.jpg
    IMG_1023.jpg
    148.4 KB · Views: 228
  • IMG_1024.jpg
    IMG_1024.jpg
    158.2 KB · Views: 245
  • IMG_1025.jpg
    IMG_1025.jpg
    153.4 KB · Views: 288
  • IMG_1026.jpg
    IMG_1026.jpg
    160.7 KB · Views: 246

KrisBlueNZ

Sadly passed away in 2015
Nov 28, 2011
8,393
Joined
Nov 28, 2011
Messages
8,393
You're welcome :)

OK. That looks like a very well-made unit and you've done a good job cleaning it up.

I'm still having trouble figuring out how it all fits together. I'll describe what I've figured out so far, and you point out any mistakes, OK?

I'm starting with the interconnection diagram from post #8. Ignoring the speaker wiring drawing at the bottom, the power amplifier is at bottom right. It gets its left and right audio signals on the violet and yellow wires, which come from the module at bottom left, which seems to be labelled "tuner".

There is a separate "mpx adapter" board at top right, which decodes FM stereo transmissions from a single signal, which comes in on the red wire, into left and right signals, which return to the tuner module on brown and blue. This mpx adapter board is probably either an option or a module that has been added after the basic product was designed.

The "record changer" at top left connects directly to the tuner module through green and black. There doesn't seem to be any active circuitry (no tubes) in the record changer unit.

The first picture in post #10 shows that the power amp and the mpx adapter are mounted on the bottom of the unit, and the tuner is mounted below the top panel, presumably with the potentiometer shafts going through holes in the top panel.

The fourth picture in post #10 seems to show the green and black wires where they plug into the record changer. The fifth picture shows the "back" of the tuner module, if the "front" is the side the pot shafts emerge from.

The "tuner" module seems to be the only part that's relevant to the changes you want to make. This is the module that you called the "control panel" in post #10.

It's not clear from the interconnection diagram in post #8 which side is the front of the tuner module. I THINK the pot shafts emerge from the edge that's at the TOP in that diagram. This fits with picture 5 in post #12 which shows the underside of the tuner module, with the blue printed circuit board at the "back" and the pots at the "front".

Picture 7 in post #12 shows the rows of sockets where the different signals come in to the tuner board, and the connections to the input selector switch. The next three controls working rightwards are the volume, treble, and bass at the end.

I'm interested in the rectangular mustard-coloured thing behind the volume pot. It's shown more clearly in picture 6. I'm not sure what it is. It looks like it might be a thick film resistor array. It appears to have quite a few wires emerging from it. Is that right? What are the markings on it?

Can you have a close look at the volume potentiometer and post all the markings you can find?

What do you intend to do about the existing treble and bass controls? Their function would be superseded by the graphic equaliser. Would it be alright if they were just disconnected?

Please keep looking for technical information on this unit. A schematic of the tuner would be extremely helpful. A schematic for the tuner of a similar unit would probably be just as good.

Re the LM358 op-amps... They will work but I wouldn't use them; I have had bad experiences with crossover distortion with these old devices. That's why I suggested the MC34072. They have extremely low distortion.
 

whiterabbit

Sep 14, 2013
90
Joined
Sep 14, 2013
Messages
90
Sorry for the longer-than-normal delay there, I had to put aside my projects yesterday after work and take care of some stuff.

Back to the important things!

I'm starting with the interconnection diagram from post #8. Ignoring the speaker wiring drawing at the bottom, the power amplifier is at bottom right. It gets its left and right audio signals on the violet and yellow wires, which come from the module at bottom left, which seems to be labelled "tuner".

Right.

There is a separate "mpx adapter" board at top right, which decodes FM stereo transmissions from a single signal, which comes in on the red wire, into left and right signals, which return to the tuner module on brown and blue.

Right.

The "record changer" at top left connects directly to the tuner module through green and black. There doesn't seem to be any active circuitry (no tubes) in the record changer unit.

Right.

The first picture in post #10 shows that the power amp and the mpx adapter are mounted on the bottom of the unit, and the tuner is mounted below the top panel, presumably with the potentiometer shafts going through holes in the top panel.

Right.

The fourth picture in post #10 seems to show the green and black wires where they plug into the record changer.

Right.

The fifth picture shows the "back" of the tuner module, if the "front" is the side the pot shafts emerge from.

It's not clear from the interconnection diagram in post #8 which side is the front of the tuner module. I THINK the pot shafts emerge from the edge that's at the TOP in that diagram. This fits with picture 5 in post #12 which shows the underside of the tuner module, with the blue printed circuit board at the "back" and the pots at the "front".

Yes, although I should clarify here... so the pot shafts stick directly up in that picture, and the part you can see is the same face pictured more closely in post #12, images 3 and 4. The reverse side of that face is pictured in post #12, pics 5-7 (with the blue circuit board, pot connections, etc.). In post #10, picture 5, the internal circuitry is hidden.


Picture 7 in post #12 shows the rows of sockets where the different signals come in to the tuner board, and the connections to the input selector switch. The next three controls working rightwards are the volume, treble, and bass at the end.

Almost- left to right: Input, volume, bass, trebel.

I'm interested in the rectangular mustard-coloured thing behind the volume pot. It's shown more clearly in picture 6. I'm not sure what it is. It looks like it might be a thick film resistor array. It appears to have quite a few wires emerging from it. Is that right? What are the markings on it?

Can you have a close look at the volume potentiometer and post all the markings you can find?

So- it does look like it might be a resistor array, although having worked with much more modern components I've never seen anything quite like it. The coating seems to be the same color/consistency of other components that I am far more certain are resistors.

The markings are all numbers:
1345?02
25041-?
(the ? are spaces covered by wires that I couldn't bend out of the way... so there may not actually be no numbers underneath, but I just couldn't tell)

Then the bottom row is just a label for the wires coming in
1234567

What do you intend to do about the existing treble and bass controls? Their function would be superseded by the graphic equaliser. Would it be alright if they were just disconnected?

I was planning on leaving them in place, even with the possibility of having the external EQ attached. I figured the less I tried to modify the existing functioning bits, the higher my odds of having a successful end result will be! I can always go back later and remove them if it is causing problems.

Please keep looking for technical information on this unit. A schematic of the tuner would be extremely helpful. A schematic for the tuner of a similar unit would probably be just as good.

I will absolutely continue to research and see what I can come up with. Tonight if I have time, or maybe tomorrow on my lunch break or after work.

Re the LM358 op-amps... They will work but I wouldn't use them; I have had bad experiences with crossover distortion with these old devices. That's why I suggested the MC34072. They have extremely low distortion.

I found two 6v batteries, so I'm gonna check and see if I can get this EQ working tonight and if I can, I will order the MC34072's and start preparing to build the buffer!


In addition to simply wanting to see if I could make it work at all, the other reason I was interested in adding the EQ to the record player setup was because I have also been considering adding an aux cable in so that I can hook up more modern music players (phone, laptop, etc.) and play them through these speakers. Since modern music is louder and generally more intense, I figured that it would be a good safeguard to have extra control over the signal to keep the speakers from getting worked too hard and blowing out. That is the lowest priority at this point, though. I didn't realize how many factors needed to be considered for this project!!

Still, once it is completed, I know it will be totally worth the effort :D
 

KrisBlueNZ

Sadly passed away in 2015
Nov 28, 2011
8,393
Joined
Nov 28, 2011
Messages
8,393
OK, I understand about the tuner. There's the row of five controls, and the tuning pointer moves left and right against the panel above them. I can see the brackets for the light bulbs at each end for illumination.

OK, so the treble control is at the end.

So- it does look like it might be a resistor array, although having worked with much more modern components I've never seen anything quite like it. The coating seems to be the same color/consistency of other components that I am far more certain are resistors.
OK, that might make things difficult. It's probably a custom resistor array made for that company only. A schematic would be very helpful.

Can you post more photos of the volume, bass and treble potentiometers from different angles? If possible, take it outside but not in direct sunlight. If we can't find a schematic we will have to reverse-engineer all the circuitry that connects to those three pots.

Also, I need to know the value of the volume potentiometer. Can you have a close look at the back and tell me all the markings on it?

Regarding the existing tone controls, it will probably work out better to disconnect them. You might be able to reuse those potentiometer positions for other things - perhaps an extra input selector, since you mentioned that you want to add features to it.

I will absolutely continue to research and see what I can come up with. Tonight if I have time, or maybe tomorrow on my lunch break or after work.
Please do. A schematic would be very helpful.

I found two 6v batteries, so I'm gonna check and see if I can get this EQ working tonight and if I can, I will order the MC34072's and start preparing to build the buffer!
Cool :)

The MC34072 is a dual op-amp so you'll only need one, but it can't hurt to have a spare. You'll also need a piece of stripboard, an 8-pin IC socket, and some resistors and capacitors. I'll draw up a schematic soon.

In addition to simply wanting to see if I could make it work at all, the other reason I was interested in adding the EQ to the record player setup was because I have also been considering adding an aux cable in so that I can hook up more modern music players (phone, laptop, etc.) and play them through these speakers. Since modern music is louder and generally more intense, I figured that it would be a good safeguard to have extra control over the signal to keep the speakers from getting worked too hard and blowing out. That is the lowest priority at this point, though.
Fair enough. Are you planning to mount the equaliser permanently in the unit?

I didn't realize how many factors needed to be considered for this project!!
Right. The facts that it uses toobs, and we don't have a schematic, are the problem.

Still, once it is completed, I know it will be totally worth the effort :D
I hope so!
 

whiterabbit

Sep 14, 2013
90
Joined
Sep 14, 2013
Messages
90
Just a quick update before I pass out for the night- was able to run 12v through the EQ without starting a fire or melting anything... so consider that a success ;)

I ended up using the black and orange (instead of red) leads simply because orange was already stripped. Tomorrow afternoon after taking more detailed pictures of the pot connections for you, I'm planning on seeing if I can get any sort of signal through the EQ at all and out of the record player speakers. I know you said it will need the buffer, etc., but I realized I actually don't have anything else that uses that type of audio input to test it on and make sure the rest of the EQ works. So, gonna try and see if I get anything at all.

I will hold off on ordering any necessary parts (op amps, capacitors) until the schematic is done so I can get it all at once. Thank you so much for that, by the way. I have a ton of resistors and I think I might even have a few IC sockets and strip board left over from other projects.

I'm curious though why the pots need to be rewired though, since everything is currently working. Is that only necessary if we are removing the bass and treble knobs- or is there another reason I'm not understanding?
 

KrisBlueNZ

Sadly passed away in 2015
Nov 28, 2011
8,393
Joined
Nov 28, 2011
Messages
8,393
Whether changes will be needed to the tone controls depends on how they're connected. Now that I know you want to keep them, I'll bear that in mind.

Here's a design for a stereo audio signal buffer.

attachment.php


It has an input impedance of 1 megohm, which is probably close to the resistance of the existing volume control in the tuner.

You need to disconnect the left and right audio signals from the clockwise end of the volume pot, and feed them into this circuit.

It also needs a +12V supply. Its 0V rail connects to the negative of that supply, and to the chassis of the tuner.

The circuit consists of two "inverting amplifier" stages, using the two op-amps inside the MC34072 dual op-amp IC. One op-amp is used for each channel.

The outputs feed to the graphic equaliser, and the signals that come back from the outputs of the graphic equaliser need to connect to the clockwise end terminals of the volume pot.

The circuit can be constructed on stripboard. Do a Google search for tutorials on how to build a circuit up on stripboard. There's one on this site, in the tutorials section, but I'm not sure how complete it is.

None of the components are unusual in any way. Here are links to them on Digikey. You can probably also get them from a local electronic component store.

R1-4 1 megohm metal film resistor 1/4 or 1/3 watt http://www.digikey.com/product-detail/en/MFR-25FBF52-1M/1.00MXBK-ND/13714 x4
R5-8 100 kilohm metal film resistor 1/4 or 1/3 watt http://www.digikey.com/product-detail/en/MFR-25FBF52-100K/100KXBK-ND/13473 x4
R9 10 ohm metal film resistor 1/4 or 1/3 watt http://www.digikey.com/product-detail/en/MFR-25FBF52-10R/10.0XBK-ND/4191 x1
C1-5 10 microfarad 16V electrolytic capacitor http://www.digikey.com/product-detail/en/ESK106M016AC3AA/399-6597-ND/3083012 x5
C6 100 microfarad 16V electrolytic capacitor http://www.digikey.com/product-detail/en/ESK107M016AC3AA/399-6601-ND/3083016 x1
U1 MC34072P dual op-amp IC http://www.digikey.com/product-detail/en/MC34072PG/MC34072PGOS-ND/919075 x1
8-pin IC socket for (U1) http://www.digikey.com/product-detail/en/4808-3004-CP/3M5473-ND/1133626 x1

Connections can be made using wires soldered onto the stripboard tracks.

Edit: Fixed polarity of C3 and C4
 

Attachments

  • WHITERAB.002.GIF
    WHITERAB.002.GIF
    6.5 KB · Views: 1,578
Last edited:

whiterabbit

Sep 14, 2013
90
Joined
Sep 14, 2013
Messages
90
Hey!

Thank you for the diagram. I should be able to follow along with that alright. You said that this should also be able to run off of the 12v converter that the EQ will be powered by, correct?

I will put in an order for those parts either tonight or sometime tomorrow.

Just on my lunch break now...

Did some quick googling, and was able to find this: https://app.box.com/s/tbidoxtpq2prov21coh9

I wouldn't say its *very* close, BUT it IS the most detailed Magnavox schematic from the 60's that I've been able to locate SO FAR. And externally the chassis looks fairly similar. I will call this a reference/ starting point, and continue looking after work after I post more pictures per your request.
 

whiterabbit

Sep 14, 2013
90
Joined
Sep 14, 2013
Messages
90
Success!

Great news! I hooked up the EQ in line with the record player and toggled the bypass button a couple times- it works!

You were also absolutely right- the EQ being on definitely drops the overall volume substantially. I will order the parts for the buffer circuit tonight and begin looking at converters as well.

I will also continue to look for more closely related schematics tomorrow on my breaks from work.

Here are the additional pictures of potentiometers taken from a couple different angles.
 

Attachments

  • IMG_1033.jpg
    IMG_1033.jpg
    154.5 KB · Views: 252
  • IMG_1032.jpg
    IMG_1032.jpg
    151.6 KB · Views: 231
  • IMG_1034.jpg
    IMG_1034.jpg
    145 KB · Views: 226
  • IMG_1035.jpg
    IMG_1035.jpg
    145.9 KB · Views: 231
  • IMG_1036.jpg
    IMG_1036.jpg
    154.2 KB · Views: 225
  • IMG_1037.jpg
    IMG_1037.jpg
    152.6 KB · Views: 212
  • IMG_1038.jpg
    IMG_1038.jpg
    148.4 KB · Views: 253
  • IMG_1039.jpg
    IMG_1039.jpg
    145.7 KB · Views: 246
  • IMG_1040.jpg
    IMG_1040.jpg
    149.9 KB · Views: 250
  • IMG_1041.jpg
    IMG_1041.jpg
    146 KB · Views: 228

KrisBlueNZ

Sadly passed away in 2015
Nov 28, 2011
8,393
Joined
Nov 28, 2011
Messages
8,393
Yes, you can power the buffer from the same 12V supply that you use for the graphic equaliser.

The document you linked to is very nice, but it's for transistorised models. If you can find a Sams Photofact document for a toob model from the same era as yours, that could be very useful.

Thanks for the extra photos. I can see that there's another custom thick film unit - a brown one, behind the bass potentiometer. I can't really figure out the design very well from the photos, unfortunately. I really hope you can find a schematic. Otherwise you could consider sending it to me - or someone else who's closer!
 
Top