Maker Pro
Maker Pro

Question about repairing a Samsung Syncmaster p2450h monitor

bardos

Jun 2, 2019
7
Joined
Jun 2, 2019
Messages
7
hello all, new member here seeking help,

I am going to attempt to repair my Samsung Syncmaster p2450h monitor. The basic problem is that the menu buttons, which are LEDs and touch activated on the bottom right hand side of the screen do not really work to turn on the monitor or to adjust settings. Actually they do work one time out of 50... they almost can't be seen, they don't light up. So my question, that I need help with is, if I replace the power board, would this fix this issue with the menu buttons? (once it turns on it's fine).

Much obliged for any assistance. (At the moment I'm working on splitting the monitor case)

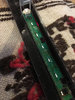
edit: I just opened the monitor and found that it has a special little board that holds the LED lights. Would it also hold the touch screen for the menus?
 
Last edited:

Bluejets

Oct 5, 2014
6,922
Joined
Oct 5, 2014
Messages
6,922
Looks like it has had a pretty hard life so far.

It would seem logical the "touch" part would be integrated into that board in the photo.

Maybe crook connection where it plugs in .

Perhaps if you removed some of the dirt and filth from in and around the board. ??

Low level of the LED's suggest it's not getting correct operating voltage so back to the beginning.
 

bardos

Jun 2, 2019
7
Joined
Jun 2, 2019
Messages
7
That LED module seems un-removable from the bezel. When you say: "back to the beginning", do you mean I should go for a replacement power board. Only $13.28 on ebay...
 

Bluejets

Oct 5, 2014
6,922
Joined
Oct 5, 2014
Messages
6,922
When you say: "back to the beginning",

yes well, when i wrote that I thought maybe they will think ....noooo, never but there ya go.
"beginning" means start of #3 reply.

As far as the LED module being unmovable, perhaps but can you not check connections and give it a clean while it is in place..??
oh, and do NOT use soap and water.

AS far as replacement, the fault could be in the connector so you may not solve anything with a new unit. Also then you would have to get around the fact that it is "not removable".:eek::eek:
 
Last edited:

bardos

Jun 2, 2019
7
Joined
Jun 2, 2019
Messages
7
If the leds are not getting correct voltage, might that not indicate the power board? Will clean what I can and see if there is a way to remove that led module
 

bardos

Jun 2, 2019
7
Joined
Jun 2, 2019
Messages
7
Managed to pry open the module, removing the white cover. Had to be careful because I had no idea what would happen when prying, plastic stuff, but the cover came off, exposing the circuit board. Had lots of rust on it, I used alcohol and cue-tips to remove what i could. Looked to find this module on-line, hard to find, as well it's three times as expensive as the power board itself. Go figure. Not sure how to remove the circuit board itself as it seems very well attached to the black plastic bezel, obviously pressing on the dots on the outside of the bezel where one touches to see menus and power on.
 

Attachments

  • IMG_2488.JPG
    IMG_2488.JPG
    625.4 KB · Views: 8

Bluejets

Oct 5, 2014
6,922
Joined
Oct 5, 2014
Messages
6,922
If the leds are not getting correct voltage, might that not indicate the power board? Will clean what I can and see if there is a way to remove that led module

I assumed the rest was working.
You do not say.

Board looks a real mess especially down the lower part of the latest photo.
Looks like the main on off has corroded tracks.

Isopropyl Alcohol is the usual cleaner liquid.
Usually small containers of 250ml or about that cost an arm and a leg but 1 litre containers can be had from places like Ebay maybe $20 delivered.
Depends where you live .
Failing that I have used methylated spirits at times if the former runs out.
 

bardos

Jun 2, 2019
7
Joined
Jun 2, 2019
Messages
7
Yes, if and when i made contact with the on-off switch the monitor worked perfectly. I'm pretty sure now that this module is defective. I have found it online, but may take a couple of weeks to arrive. (China) Yes, used isopropyl alcohol to clean. As well, I'm betting that when I carefully examine the new module, I'll have a better idea of how to remove this one. I suspect that there is some very sticky tape keeping it in place. But I'll know better when i see the reverse side.

ezgif-5-33b7037e1004.jpg
 

Bluejets

Oct 5, 2014
6,922
Joined
Oct 5, 2014
Messages
6,922
OK...good to see you are getting some success.

Can you post a link to where you found the spare switch pcb online for any future enquiry?
EDIT:- ...I have exact same unit...must be millions of these models around.

Fixing method may well be as you suspect with the "sticky stuff" .
Never really meant to be repaired these days. :):)
Cheers Jorgo
 

Martaine2005

May 12, 2015
4,951
Joined
May 12, 2015
Messages
4,951
As it works 50% of the time, I would be inclined to keep cleaning and scraping. Then with your soldering iron, re-touch all solder joints. I would guess that the conneter near C1 is the culprit. Dry and corroded solder joints.

Martin
 
Top