Maker Pro
Maker Pro

Error in electric linear actuators and limit switches

dodulation

Mar 25, 2017
5
Joined
Mar 25, 2017
Messages
5
I build thermostatic controlled vent/hatch openers with 4 electric linear actuators and limit switches. When I installed the first actuator with the limit switches it worked fine but after the other actuators where installed the limit switches only work when they are all activated. That means that the actuators stop whenever the last actuator has pushed the limit switch. So I have paralleled them but looking to the schematic makes me believe this should work properly. Does anyone see the flaw in this diagram and has a suggestion how this diagram should be, preferably without the use of 4 different relays?

Capture.PNG
 

Harald Kapp

Moderator
Moderator
Nov 17, 2011
13,722
Joined
Nov 17, 2011
Messages
13,722
Please use dots where there are electrical connections in your diagram. Otherwise it is very hard to find out where crossing lines do connect and where they don't.

Also a bit of description of the expected behavior would help us understand your problem:
  • What is the function of the switches S1...S3?
  • What are the IN- and OUT-switches supposed to do? Are these the limit switches you're talking about? If so, when are the activated and what is the inactive position (open or close)?
It may even be helpful to post a schematic of the signle cylinder setup that worked for you.

Regards,
Harald
 

73's de Edd

Aug 21, 2015
3,622
Joined
Aug 21, 2015
Messages
3,622
Sir dodulation . . . . .


I just wildly guesstimated the systems actual function . . . . Could as equally be a quail eggs incubator.

The action I visualize here is that the system is initially being show in its dormant state, and the S1 thermostat not receiving a high enough ambient air temp to activate it.

Getting on about noon time the temperature has risen and the biddies are a cackling and getting restless on their nests. The ambient temp finally hits the threshold of the thermostat closing its S1 switch.

That sets the 4 ventilator fans a spinning and the power to the relay has flipped the polarity of power to the linear activators and they all start progressively opening their vents.

( CONSIDERING, the power supply amperage can HANDLE all of them running at once ? )

They run down to their extremes and have their vents opened and start disconnecting as they mechanically flip their limit switches. This now has all vents open and the circulating fans distributing a linear air flow for cooling.

This will continue, until such time that the cooled air is low enough to trip the thermostat , which then drops the power to the relay coil, whose contacts then flip polarity to the actuators and they then reverse direction and start closing the vents . Those last stage movements, trip the limit switches and de power the linear actuators. All is then staying dormant until another thermostat request for cooling.


Some windy days might permit the free circulation of air by use of the S2 and S3 over ride switches. S2 cuts the fan, while S3 opens the vents, while the wind then has a flow thru path.

Considerations and fill in corrections time . . . .

Sir Harald’s follow the dots request . . . .
( It took lebenteen times to make spel cheks keep from wanting to make you a Herald )


Nf4MrXz.png


http://i.imgur.com/Nf4MrXz.png

73’s de Edd

.
 
Last edited:

dodulation

Mar 25, 2017
5
Joined
Mar 25, 2017
Messages
5
Please use dots where there are electrical connections in your diagram. Otherwise it is very hard to find out where crossing lines do connect and where they don't.

Also a bit of description of the expected behavior would help us understand your problem:
  • What is the function of the switches S1...S3?
  • What are the IN- and OUT-switches supposed to do? Are these the limit switches you're talking about? If so, when are the activated and what is the inactive position (open or close)?
It may even be helpful to post a schematic of the signle cylinder setup that worked for you.

Regards,
Harald


Hi Harald,

Thank you for your comments. I have simplified the diagram a bit as the switches can be confusing and have nothing to do with my problem. I have also added the dots to make it clear where the wires are connected and where not. Basically, it is nothing more than a switch activating a 110 VAC relay (k1). This relay switches (flip-flops --> plus/minus = out and minus/plus = in) the positive and negative DC current to activate the linear actuators in a certain direction (K1.1 and K1.2). So, if one side is positive the linear actuators will extent, when the positive and negative will switch (swoop), they move in.

Both in and out positions of the linear actuators are equipped with a mechanical limit switch, those are indeed the IN/OUT switches which have a ‘normally close’ function. Meaning that they open when the maximum position has been reached stopping the current. I have drawn all four linear actuators in the IN position showing the IN-limit switch being activated (open).

The reason I have those limit switches is because I want to current to stop once the linear actuators reaches his maximum in or out position preventing the actuators drive motor from burning. But I only stop the current in that direction. Once the relay switches back, the current starts running in the other direction and the linear actuators start moving in.

The problem I have is that all four limit switches for the IN or the OUT positions need to be activated before the current stops while I try to have the individual linear actuators to stop since they do not run at the same speed. But now the fastest linear actuators who reaches its in/out position first only stops when the slowest linear actuators reach the max position. So evidently this diagram allows the current to all four linear actuators until all four switches have been activated. As I mentioned in my previous post; with only one actuator and two switches (IN/OUT) it works perfectly fine, it goes wrong if one or more actuators with the switches are being add.

I hope this will explain it a bit better and that you see what is wrong in the diagram.

Regards, Frank
 

Attachments

  • Capture2.PNG
    Capture2.PNG
    44.3 KB · Views: 137
Last edited:

Alec_t

Jul 7, 2015
3,590
Joined
Jul 7, 2015
Messages
3,590
You could overcome the problem by including a respective power diode in series with each limit-switch.
Like this :-
MultiActuators.PNG
 
Last edited:

Harald Kapp

Moderator
Moderator
Nov 17, 2011
13,722
Joined
Nov 17, 2011
Messages
13,722
But now the fastest linear actuators who reaches its in/out position first only stops when the slowest linear actuators reach the max position.
Why would that be so? If every actuator has its own set of limit switches, as shown in your diagram, there is no reason why the fastest actuator should have to wait for the slowest on to stop.

With the switch positions as shown in the diagram, all actuators have reached the in position, the in limit switches are open, the actuators are stopped. K1 is in the in position, but since the limit switches are open, no current flows, everything is idle.

When you now toggle K1, current will flow through the out limit switches, which are closed. The direction of the current is reversed by K1, therefore the actuators will start movin in th eopposite direction. When an actuator hits the associated out limit switch, the switch will open and the actuator will stop. The other actuators, not havng reached their end positions, will contine to operate until each has hit his own out limit switch.

Your schematic looks good. Unless your real world setup differs from your schematic, I see no reason why this should not work as expected.


Scratch head, think, scratch, think,.....

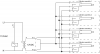
I think I see the problem: Th issue is with the opposite limit switches, in this case the in ones. Check this annotated diagram:
upload_2017-4-24_17-17-49.png
The in limit switches will close once the actuators have left their end positions. Being connected as they are, they allow current to flow from the out switches back to the other actuators. Therefore the system will stop only with the last actuator in the end position.
You can prevent this current flow by cutting the connections (green slanted cut through blue wire) and adding new connections with diodes as shown. Current can flow from the out switch back to the common connection (anodes of the diodes and K1.1), but from there on not forward to the other actuators as the other diodes are in reverse.
Of course you'll have to repeat the same for the wires going to the out switches, this time with the diodes reversed (as the polarity of the current is reversed in that direction. I leave this as an exercise to you ;).
 

dodulation

Mar 25, 2017
5
Joined
Mar 25, 2017
Messages
5
Harald / Alec,

Thank you so much. This makes perfectly sense and your colors in the diagram do make the unintended path clear. I am going to get some diodes and try this... This should be the correct diagram :)

Capture3.PNG
 

Alec_t

Jul 7, 2015
3,590
Joined
Jul 7, 2015
Messages
3,590
This should be the correct diagram :)
..... provided the in/out drive polarity is correct. There's a 50% chance you may need to reverse it (unless the actuator datasheet removes any ambiguity).
 
Top