Maker Pro
Maker Pro

Assorted Gubbins on toy tank

Crystal Wizard

Feb 10, 2016
100
Joined
Feb 10, 2016
Messages
100
UPDATE:
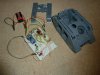
No debounce. No time-delay.
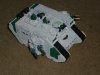
Hull Point LEDs work. (only using 2, for proof of concept/lack of pins)
Start = 2 LEDs on.
Press "down", hp--
Press "up" hp++
HP=2, both LEDs on.
HP = 1, one LED on
HP = 0, LEDs flash alternately, then go off (repeat)

I think Bounce is causing "one press" to be counted as "more than one press".
Doesn't help that I don't have switches, just touching jump-leads together. Will get switches/buttons soon, and debounce them.

But principle seems to work.

NEXT:
buttons/debounce. Then think about shift-registers to add Pins.
 

Crystal Wizard

Feb 10, 2016
100
Joined
Feb 10, 2016
Messages
100
1) Now I've started building, should this be in Project Logs, or should I continue here?

2) If I'm using shift-registers for inputs, do I still need to debounce?

3) I've been looking at shift-register output tutorials, but can't quite figure it out. They all seem to deal with "regular" outputs (counting, wipe, slide) whereas I want individually-addressed LEDs.

4) Would I2C be easier than shift-registers?
 

Gryd3

Jun 25, 2014
4,098
Joined
Jun 25, 2014
Messages
4,098
OK, Debounce. Ugh.
And checking Release as well?
This means I need to check button is not going on and off (bounce), but also check button IS going on and off (press and release to only adjust HP once per press).

OR use a Latching button (toggle?), and adjust HP each time it changes state (after debouncing)? (see picture)View attachment 25317
The bounce is generally when the contacts first make contact, not when they break... but yeah, that little chatter can cause a headache. Software de-bounce usually involves a delay and a re-check of the button. If the button get's pressed and is still pressed then it is down.
You can fix this using a capacitor as well... anyway, here is some quick material for you. The bounce happens very quickly, so a software de-bounce simply using a 'wait' command then re-checking is easy.
http://www.eng.utah.edu/~cs5780/debouncing.pdf
 

Crystal Wizard

Feb 10, 2016
100
Joined
Feb 10, 2016
Messages
100
No, I'm still struggling with debounce.
I've read lots, but I'm not taking it in. :(

Hopefully my switches arrive tomorrow, and I'll build a new circuit. Then I can rewrite my code (incl debounce)

One thing that I have NOT seen addressed is Multiple Buttons. I'm not sure which variables need altering, how much code needs duplicating, etc.
All the examples/tutorials only use ONE button, and assume you can extrapolate from there.
They also seem to use a LOT more code.
One line of "val = digitalRead(button1);" turns into 3 functions, a couple of loops, and a host of new variables! :(

I'd like to keep my code simple (so I can understand it!). That could mean using quick'n'dirty methods, or importing Libraries where someone else did all the hard work, and I just have to learn 2 new commands! ;)

Any help here would be appreciated. I'm not sure why I'm not understanding it. I get the idea, but the code just turns into dancing splodges, while my brain turns to jelly. :(
 

Gryd3

Jun 25, 2014
4,098
Joined
Jun 25, 2014
Messages
4,098
No, I'm still struggling with debounce.
I've read lots, but I'm not taking it in. :(

Hopefully my switches arrive tomorrow, and I'll build a new circuit. Then I can rewrite my code (incl debounce)

One thing that I have NOT seen addressed is Multiple Buttons. I'm not sure which variables need altering, how much code needs duplicating, etc.
All the examples/tutorials only use ONE button, and assume you can extrapolate from there.
They also seem to use a LOT more code.
One line of "val = digitalRead(button1);" turns into 3 functions, a couple of loops, and a host of new variables! :(

I'd like to keep my code simple (so I can understand it!). That could mean using quick'n'dirty methods, or importing Libraries where someone else did all the hard work, and I just have to learn 2 new commands! ;)

Any help here would be appreciated. I'm not sure why I'm not understanding it. I get the idea, but the code just turns into dancing splodges, while my brain turns to jelly. :(
Haha. welcome to firmware development :)
There are two ways to do is in software.
Method 1. Blocking. When a button press is detected, enter a simple 'wait' state and re-test the button. If it's still down after a few ms, then do your action.

Method 2. Non-blocking. This is a little trickier and requires the extra variables and functions. When a button is pushed, start a timer and keep doing other things. When the timer expires or reaches a certain value, check the button again. If it's still down then do your action.

Method 1 is going to be the easiest.
If Button then
wait 10ms
if Button then
Action!
endif
endif

It's simple and not very elegant, but does the job. A solution like this would not work though if the Arduino is directly playing audio, directly driving multi-plexed LEDs or any other timing intensive tasks.

Or do you want to tackle the non-blocking method?
 

Crystal Wizard

Feb 10, 2016
100
Joined
Feb 10, 2016
Messages
100
Thanks for the quick reply!
I think I'd prefer to use Method 2, non-blocking. It does look more elegant, if trickier.
I'm not sure if using a shift-register counts as "directly driving multiplexed LEDs" or not. I've just sent off for some 74HC595 and 74HC166 chips to run the switches/buttons, and LEDs.

I did find this Library, that might help if I could decipher it. I'm normally quite good at hacking snippets of code. :(
https://www.pjrc.com/teensy/td_libs_Bounce.html
 

Gryd3

Jun 25, 2014
4,098
Joined
Jun 25, 2014
Messages
4,098
Thanks for the quick reply!
I think I'd prefer to use Method 2, non-blocking. It does look more elegant, if trickier.
I'm not sure if using a shift-register counts as "directly driving multiplexed LEDs" or not. I've just sent off for some 74HC595 and 74HC166 chips to run the switches/buttons, and LEDs.

I did find this Library, that might help if I could decipher it. I'm normally quite good at hacking snippets of code. :(
https://www.pjrc.com/teensy/td_libs_Bounce.html
Good find on the library.
Using a shift register to drive multiple LEDs does not really count. What you end up doing is pushing serial data into the register first, then telling the register to output. Once done, you can ignore the register until you need to change an LED again.

So.. the library is a good starting point, but I think it will still turn out messy with more buttons. You can do debounce in software with a timer, or a number of cycles. You can also do some magic by checking 'all' buttons at the same time.
Anyway, here is another code mockup that may help clarify?

var Pin_Health
var Pin_Speed

function mydebounce()
if Pin_Health != GetState(Pin X) OR Pin_Speed != Getstate(Pin Y)
i = i + 1
if i => 20
Pin_Health = GetState(Pin X)
Pin_Health = GetState(Pin Y)
endif
else
i = 0
endif
endfunc

This is a very very basic function for two buttons. Does this help? (You can expand this and either use multiple copies with a different variable for i, or you can check multiple buttons on the same if statement.)
There is lots of room for improvement here though... If you press a second button at just the right moment, it may accidentally be detected as a push right away, but the 'release' of that button should still be debounced so it won't trigger multiple times.
 

Crystal Wizard

Feb 10, 2016
100
Joined
Feb 10, 2016
Messages
100
So, the code would be:

#define variables
#define function myDebounce()
//reads all buttons, checks if any have changed (initial IF statement).
// If any have changed, increment counter.
// if counter <20, do nothing.
// If counter =>20, set variables = pin-states
//should the i=0 (reset counter) be inside "if i=>20" loop? otherwise, count <20 means reset i=0?
void setup()
#initialise variables

void loop()
myDebounce() //sets all variables
#do stuff with variables e.g. light LEDs

I think I can work with that.
 

Gryd3

Jun 25, 2014
4,098
Joined
Jun 25, 2014
Messages
4,098
So, the code would be:

#define variables
#define function myDebounce()
//reads all buttons, checks if any have changed (initial IF statement).
// If any have changed, increment counter.
// if counter <20, do nothing.
// If counter =>20, set variables = pin-states
//should the i=0 (reset counter) be inside "if i=>20" loop? otherwise, count <20 means reset i=0?
void setup()
#initialise variables

void loop()
myDebounce() //sets all variables
#do stuff with variables e.g. light LEDs

I think I can work with that.
It's a simplistic way of doing it, the i=0 should trigger anytime the variables and the buttons match state.
So it would be placed as an 'else' to 'If any have changed'
 

Crystal Wizard

Feb 10, 2016
100
Joined
Feb 10, 2016
Messages
100
It's a simplistic way of doing it, the i=0 should trigger anytime the variables and the buttons match state.
So it would be placed as an 'else' to 'If any have changed'
Gotya! :)

My shift-registers and switches have arrived, so I'm off to write some code, and build some breadboards!

Watch this space! :)
 

Crystal Wizard

Feb 10, 2016
100
Joined
Feb 10, 2016
Messages
100
OK, I have a shift register for my output LEDs.
I have some code that looks at the switches/buttons and calculates values for LEDs.

I have looked at this code:
https://www.arduino.cc/en/Tutorial/ShftOut13
which uses a HEX number (equivalent to the binary on/off LEDs) in its ShiftOut function to write all the data to the register.

I am trying to alter it so that instead of a predefined pattern, I put my variables into the HEX number each time I loop. But how to get the HEX number from 8 variables?

Did I mention how much I hate writing code? ;)
 

Gryd3

Jun 25, 2014
4,098
Joined
Jun 25, 2014
Messages
4,098
OK, I have a shift register for my output LEDs.
I have some code that looks at the switches/buttons and calculates values for LEDs.

I have looked at this code:
https://www.arduino.cc/en/Tutorial/ShftOut13
which uses a HEX number (equivalent to the binary on/off LEDs) in its ShiftOut function to write all the data to the register.

I am trying to alter it so that instead of a predefined pattern, I put my variables into the HEX number each time I loop. But how to get the HEX number from 8 variables?

Did I mention how much I hate writing code? ;)
Well, if you variables are boolean (True|False) You can logically AND them together with a mask or use conditional statements to add or subtract from the HEX string... sounds messy, so I'll write out some messy code and let you clean it up again ;)
You can also assign 'numbers' to the LEDs and OR them together to make it more readable.

Anyway, this is where you can be creative. Here's how I would do it. (Although I need to make sure the & with a boolean variable works...)

LED_HP_HIGH = b00010000 & isHP_HIGH
LED_HP_MID = b00001000 & isHP_MID
LED_HP_LOW = b00000100 & isHP_LOW

LED_HEX_STRING = LED_HP_HIGH + LED_HP_MID + LED_HP_LOW

Treat them like normal variables, then turn them into a binary string, hex value, or decimal number... then simply add them all together before you push them to the Shift Register.

Resource for you : https://www.arduino.cc/en/Reference/BitwiseAnd
 

Crystal Wizard

Feb 10, 2016
100
Joined
Feb 10, 2016
Messages
100
Can't get the boolean bitmasking to work.

Have gone for shifting instead, using boolean variables:
Variables: 4 Hull Point LEDs, 3 Speed LEDs, Immobile LED = 8

byte data = 00000000;

data+=immobileled;
data <<=1;
data+=hp4led;
data<<=1;
data+=hp3led;
data<<=1;
data+=hp2led;
data<<=1;
data+=hp1led;
data<<=1;
data+=fastled;
data<<=1;
data+=slowled;
data<<=1;
data+=stopled;

I think this is working!

I've added some Serial.print lines to get some feedback, all seems good.

But circuit is acting odd (switches not doing as they should, some LEDs dim), but I'm sure that's a physical problem with circuit - am going to rip the whole thing out and start over!
 

Crystal Wizard

Feb 10, 2016
100
Joined
Feb 10, 2016
Messages
100
Circuit fixed! :)

I now have 4 Hull Point LEDs that go up and down with the two +/- switches, a speed-selector (stop, slow, fast), and if Immobile is set, speed sets to Stop, no matter the Selector!
I'm using some of the Analogue pins as Digital Inputs, but may replace this with Input Shift Registers.

Big Thanks to @Gryd3 for the fantastic help! :)

Next: Rebuild the whole thing using TWO shift-register outputs, to add a couple more Status effects and "motion detector". Then it won't be long before taking it off the breadboards and putting it in the Tank!
 

Gryd3

Jun 25, 2014
4,098
Joined
Jun 25, 2014
Messages
4,098
Can't get the boolean bitmasking to work.

Have gone for shifting instead, using boolean variables:
Variables: 4 Hull Point LEDs, 3 Speed LEDs, Immobile LED = 8

byte data = 00000000;

data+=immobileled;
data <<=1;
data+=hp4led;
data<<=1;
data+=hp3led;
data<<=1;
data+=hp2led;
data<<=1;
data+=hp1led;
data<<=1;
data+=fastled;
data<<=1;
data+=slowled;
data<<=1;
data+=stopled;

I think this is working!

I've added some Serial.print lines to get some feedback, all seems good.

But circuit is acting odd (switches not doing as they should, some LEDs dim), but I'm sure that's a physical problem with circuit - am going to rip the whole thing out and start over!
haha. Good job on the shifting!
There are so many different ways to do things at this point, all anyone can do is provide their preference.

Circuit fixed! :)

I now have 4 Hull Point LEDs that go up and down with the two +/- switches, a speed-selector (stop, slow, fast), and if Immobile is set, speed sets to Stop, no matter the Selector!
I'm using some of the Analogue pins as Digital Inputs, but may replace this with Input Shift Registers.

Big Thanks to @Gryd3 for the fantastic help! :)

Next: Rebuild the whole thing using TWO shift-register outputs, to add a couple more Status effects and "motion detector". Then it won't be long before taking it off the breadboards and putting it in the Tank!
I look forward to seeing the finished product :)
 

Crystal Wizard

Feb 10, 2016
100
Joined
Feb 10, 2016
Messages
100
If it will whet your appetite, here is a pic of my previous (non-electronic) version, and my Work-In-Progress.

The colours will be reversed, with the LEDs on the (currently unattached) top-plate.
 

Attachments

  • P1030016 - Copy.JPG
    P1030016 - Copy.JPG
    139.2 KB · Views: 55
  • P1030019.JPG
    P1030019.JPG
    184.5 KB · Views: 94

Gryd3

Jun 25, 2014
4,098
Joined
Jun 25, 2014
Messages
4,098
If it will whet your appetite, here is a pic of my previous (non-electronic) version, and my Work-In-Progress.

The colours will be reversed, with the LEDs on the (currently unattached) top-plate.
Haha! There is more room in there than I first thought.
Thanks for sharing.
 

Crystal Wizard

Feb 10, 2016
100
Joined
Feb 10, 2016
Messages
100
Well, that was fun!
Built my input shift-register circuit and ... it all went wrong! Input not working right, and also output seems to have gone wrong.

I've removed the input register, rewired the output and am going back to my previous code.

And ... BOOM! :(

I accidentally shorted 5V to GND and there was a little *crack*, the smell of burning and some Magic Smoke leaked out of the Arduino! :(

I'll get back to you in a few days when I've got a replacement ...
 

Gryd3

Jun 25, 2014
4,098
Joined
Jun 25, 2014
Messages
4,098
Well, that was fun!
Built my input shift-register circuit and ... it all went wrong! Input not working right, and also output seems to have gone wrong.

I've removed the input register, rewired the output and am going back to my previous code.

And ... BOOM! :(

I accidentally shorted 5V to GND and there was a little *crack*, the smell of burning and some Magic Smoke leaked out of the Arduino! :(

I'll get back to you in a few days when I've got a replacement ...
:confused:Oh no!
If it helps at all... an Arduino is usually just an AVR soldered on the board with extra components and a 'bootloader' pre-installed. If you can source an AVR of the same part number cheaper than the entire Arduino, it's possible to swap out the part and re-flash the bootloader.. (Although not nearly as easy)
 

Crystal Wizard

Feb 10, 2016
100
Joined
Feb 10, 2016
Messages
100
It's an Arduino Nano clone. £3.50 from ebay. I've ordered a few more :)
The annoying thing is that they won't arrive until after the weekend! :(
 
Top