

Project Log
After much deliberation and questions on the forums, I finally bought a K40 laser cutter. It cost around £350 (after discounts) and was delivered within 2 days from a UK warehouse - which means I can avoid any lengthy delays and import fees from ordering direct from China. Here's the model I went for:
https://www.aliexpress.com/item/UK-...-Engraver-Cutter-woodworking/32810421426.html
I'd like to think I've got quite realistic expectations for this laser cutter, as it barely cost much more than it would be to buy a cheap 40W CO2 laser tube. I know it'll need a lot of tinkering to get the most of it, which is half the fun") .
.
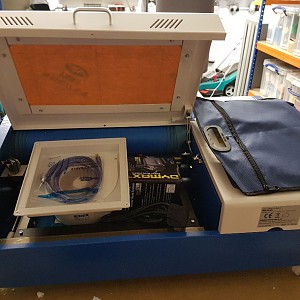
It was packaged securely and arrived without a scratch - thankfully the glass laser tube survived the journey:

A few accessories were provided, tucked away inside the lid:

There was a manual in English, software CD + license dongle, water pump (for liquid cooling), extractor fan and hose. The only other thing that is required is a bucket or similar container, plus some distilled water to circulate through the laser tube.
For some odd reason, the laser cutter comes with castors - but it's clearly designed to be used on a workbench. Before I did anything else, I unscrewed the nuts from within the chassis to remove these.
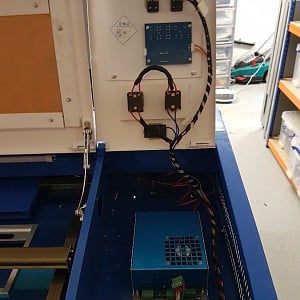
Before powering the laser cutter up, I gave the machine a once over to check all of the connections. Thankfully, the quality within the main unit seems acceptable - there were a few connections that had bootlace ferrules a little too long (not dangerous, but I gave them a trim and reconnected them). It's cheaply fabricated but seems solid enough. However, I'm a little concerned that there is no laser interlock for the lid, so this is one of the things I'll be changing as soon as possible.
Here's a photo of inside the electronics bay (the loose connection was intentional!):

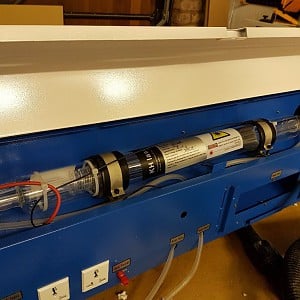
Here's the 40W CO2 laser tube, underneath a cover at the rear of the unit:

The laser tube was manufactured only a couple of months ago, so it's comforting to know it wasn't sat on a shelf for a year or two before I used it.
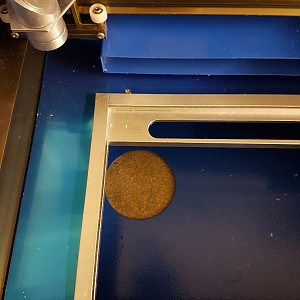
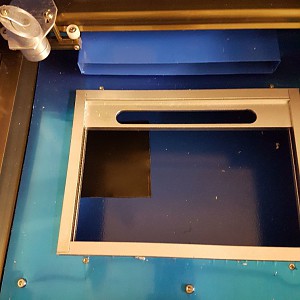
The gantry system within the laser cutter uses basic linear rails to control the X and Y axis, and there's an awfully small clamp build in to the cutting bed. The total cutting area is around 300x200mm, but the clamp can only hold around half of this area. As soon as possible, I'll be upgrading to a honeycomb bed so that I can replace the stock clamp.
I did notice that there was a big hole in the base of the unit, perhaps for ventilation or access. Either way, it will be under the beam path at some point - so this is a terrible idea, considering I'm using a wooden workbench underneath! I cut a piece of old oven try and patched the area, which should absorb any impact that would otherwise hit the desk.
Here's the offending hole:

And here's the (messy) patch:

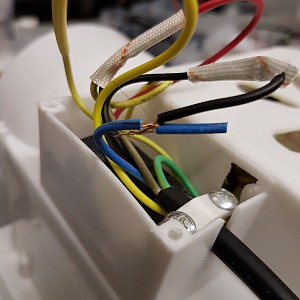
The basic checks on the laser are now done, so I thought I'd check the innards of the extraction fan as it looks terrible quality. It's so flimsy that it'll be replace as soon as I can, as I don't trust it. It was lucky I did check the fan, as here's how they've spliced mains voltage cables:

They've just lightly twisted the cores of the cables, not even bothering to remove the remaining piece of insulation that hangs on to part of it. They've then used loose sleeving to cover these connections. I'm sure that it'll work fine for a while, until it starts a fire when the cable is tugged.... I highly recommend anyone that buys a low-end Chinese laser cutter to check their fan connections, as many of the 40W devices seem to use these flimsy fan units.
I've fixed these connections for now, but I'll be replacing this fan ASAP - as it's under-powered and poorly made.
Here's a list of improvements and modifications that I'm aiming to complete, some of which I'll post about separately if it may be useful to other laser cutter owners:
Update (29/4/18):
Most of the parts I've been waiting for have arrived, so I've been able to replace the exhaust fan with an inline extractor fan (much quieter and safer!).
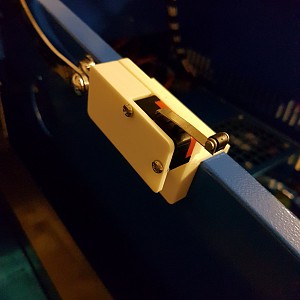
I've also added a lid interlock switch, so that if the lid is lifted whilst the laser is in operation, it will cut out. I printed an enclosure for a microswitch which slides along a lip on the sheet metal chasis:


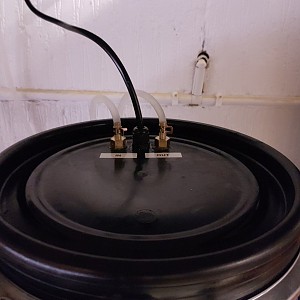
The water cooling bucket has also been switched to a closed loop system, to prevent any dust/swarf ingress from other nearby machines. It also means that the water should last a long time before it needs changing. I added a small amount of biocide to some distilled water - it doesn't appear to have effected the conductivity of the water, thankfully.
Here's the reservoir with 6mm brass connectors for the water inlet/outlet:

There's also a small aquarium air-compressor which feeds in to a 3d printed air-assist attachment. This should help keep the smoke away from the focusing lens, as well as tamper any flames. Here's the model I used from Thingiverse.
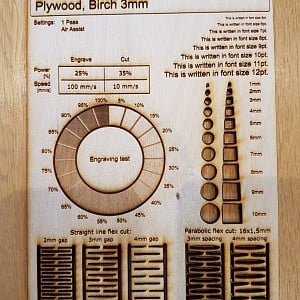
Now that most of the important upgrades are finished, I did the first full test cut. I'm still a little unsure of optimal speed/power settings as there is a huge variance between recommendations I've seen online - but the initial cuts on a 3mm plywood test sheet turned out ok:

There's some shadowing around some of the cuts, so I'm going to double-check the alignment (and give the mirrors another clean). I'm pretty pleased at how the test card came out, now I just need to try a few other speed/power combinations and see if I can reduce the smoke blur along the laser path.
Here's a quick video of it in action whilst I did a raster test:
https://www.aliexpress.com/item/UK-...-Engraver-Cutter-woodworking/32810421426.html
I'd like to think I've got quite realistic expectations for this laser cutter, as it barely cost much more than it would be to buy a cheap 40W CO2 laser tube. I know it'll need a lot of tinkering to get the most of it, which is half the fun
.It was packaged securely and arrived without a scratch - thankfully the glass laser tube survived the journey:
A few accessories were provided, tucked away inside the lid:
There was a manual in English, software CD + license dongle, water pump (for liquid cooling), extractor fan and hose. The only other thing that is required is a bucket or similar container, plus some distilled water to circulate through the laser tube.
For some odd reason, the laser cutter comes with castors - but it's clearly designed to be used on a workbench. Before I did anything else, I unscrewed the nuts from within the chassis to remove these.
Before powering the laser cutter up, I gave the machine a once over to check all of the connections. Thankfully, the quality within the main unit seems acceptable - there were a few connections that had bootlace ferrules a little too long (not dangerous, but I gave them a trim and reconnected them). It's cheaply fabricated but seems solid enough. However, I'm a little concerned that there is no laser interlock for the lid, so this is one of the things I'll be changing as soon as possible.
Here's a photo of inside the electronics bay (the loose connection was intentional!):
Here's the 40W CO2 laser tube, underneath a cover at the rear of the unit:
The laser tube was manufactured only a couple of months ago, so it's comforting to know it wasn't sat on a shelf for a year or two before I used it.
The gantry system within the laser cutter uses basic linear rails to control the X and Y axis, and there's an awfully small clamp build in to the cutting bed. The total cutting area is around 300x200mm, but the clamp can only hold around half of this area. As soon as possible, I'll be upgrading to a honeycomb bed so that I can replace the stock clamp.
I did notice that there was a big hole in the base of the unit, perhaps for ventilation or access. Either way, it will be under the beam path at some point - so this is a terrible idea, considering I'm using a wooden workbench underneath! I cut a piece of old oven try and patched the area, which should absorb any impact that would otherwise hit the desk.
Here's the offending hole:
And here's the (messy) patch:
The basic checks on the laser are now done, so I thought I'd check the innards of the extraction fan as it looks terrible quality. It's so flimsy that it'll be replace as soon as I can, as I don't trust it. It was lucky I did check the fan, as here's how they've spliced mains voltage cables:
They've just lightly twisted the cores of the cables, not even bothering to remove the remaining piece of insulation that hangs on to part of it. They've then used loose sleeving to cover these connections. I'm sure that it'll work fine for a while, until it starts a fire when the cable is tugged.... I highly recommend anyone that buys a low-end Chinese laser cutter to check their fan connections, as many of the 40W devices seem to use these flimsy fan units.
I've fixed these connections for now, but I'll be replacing this fan ASAP - as it's under-powered and poorly made.
Here's a list of improvements and modifications that I'm aiming to complete, some of which I'll post about separately if it may be useful to other laser cutter owners:
- Upgrade to honeycomb bed
- Swap extraction fan for one that won't burn the house down
- Change controller to Arduino that runs modified 3D Printer firmware, allowing GCODE execution and standalone operation.
- Add microswitch to lid as a basic laser operation interlock.
- Add mA readout to ensure that laser operates at sensible limits
- Add flow indicator and temperature alarm, to make sure that laser tube doesn't overheat
- Add air-assist to cutting head
Update (29/4/18):
Most of the parts I've been waiting for have arrived, so I've been able to replace the exhaust fan with an inline extractor fan (much quieter and safer!).
I've also added a lid interlock switch, so that if the lid is lifted whilst the laser is in operation, it will cut out. I printed an enclosure for a microswitch which slides along a lip on the sheet metal chasis:
Here's the reservoir with 6mm brass connectors for the water inlet/outlet:
First test! (29/4/18)Now that most of the important upgrades are finished, I did the first full test cut. I'm still a little unsure of optimal speed/power settings as there is a huge variance between recommendations I've seen online - but the initial cuts on a 3mm plywood test sheet turned out ok:
There's some shadowing around some of the cuts, so I'm going to double-check the alignment (and give the mirrors another clean). I'm pretty pleased at how the test card came out, now I just need to try a few other speed/power combinations and see if I can reduce the smoke blur along the laser path.
Here's a quick video of it in action whilst I did a raster test: